Make sure to join my list for Weekly Tips and Recipes to Your Inbox
15 Creative Hand Embroidery Art Ideas
I had no idea that stitching would become such a personal way for me to communicate my feelings when I first picked up my needle and thread. All I wanted was a hobby to help me get past the creativity block I had been experiencing for months. But even after hours of stitching, all I could see were the mistakes, the cloth that seemed to resist, the small misalignments, and the uneven lines. Particularly while creating my most recent creation, my first original design, I struggled with feelings of pride and fear. Was this little ghost surrounded by floral embroidery art even good enough to share
Despite the doubts, I pressed on. There’s something powerful about watching a concept come to life thread by thread. This latest project, a whimsical ghost nestled among colorful flowers, was inspired by the emotions Phoebe Bridgers’ music stirs in me, spooky, sweet, and a little sad. It’s far from perfect, stitched on fabric more suited to cross-stitch than free-form embroidery art, but every flaw adds to its charm.
I didn’t come here to say “boo,” I came to say “I love you” a silly quote, sure, but one that somehow captured the heart of my design. I didn’t anticipate that the contrast between the gentle tones for the flowers and the black thread for the ghost would feel so significant.
As I look at the completed piece, my very first original creation, I see that perfection isn’t the goal of embroidery art. It’s about emotion, connection, and the quiet patience of the process. The imperfections? They’re part of the story. Every comment I received was kind, funny, or deeply encouraging, reminding me that what I saw as “mistakes” were invisible to others.
This tiny ghost and flower combo may be stitched on the wrong fabric, with awkward tension and uneven lines, but it’s mine. And honestly? It’s my favorite piece of art I now own. Below are 15 hand embroidery art ideas with precise techniques and actionable tips for elevating your artistry.
Choosing the Right Materials
- Fabric: Linen, cotton, canvas, or felt. Choose a tight weave for detailed work, a loose weave for textured pieces.
- Needles: Use embroidery needles with sharp points and large eye sizes 7–10 are ideal for general work.
- Thread: Opt for stranded cotton, silk, or wool floss. Experiment with metallic and variegated threads for emphasis.
- Hoops & Frames: Keep fabric taut using wooden or plastic hoops. For permanent displays, frame pieces using shadow boxes.
Transfer Techniques for Accuracy
- Lightbox Method: Trace designs with a pencil through thin fabrics.
- Water-Soluble Pens: Ideal for freehand or stenciled patterns.
- Iron-On Transfers: Fast and durable, perfect for complex outlines.
- Printable Stabilizer: Print your design, stitch over it, and rinse away.
Essential Tools for Precision
- Embroidery scissors for clean cuts.
- Thread organizers for efficient color management.
- A thimble or finger guard for comfort during long sessions.
- Magnifying light for detail-oriented work.
Finishing and Framing Tips
- Gently wash finished embroidery in cold water and mild soap.
- Press the back with a cloth barrier to avoid flattening stitches.
- Mount on foam board or stretch over a wooden frame for display.
- Seal delicate threads with invisible fabric spray if needed.
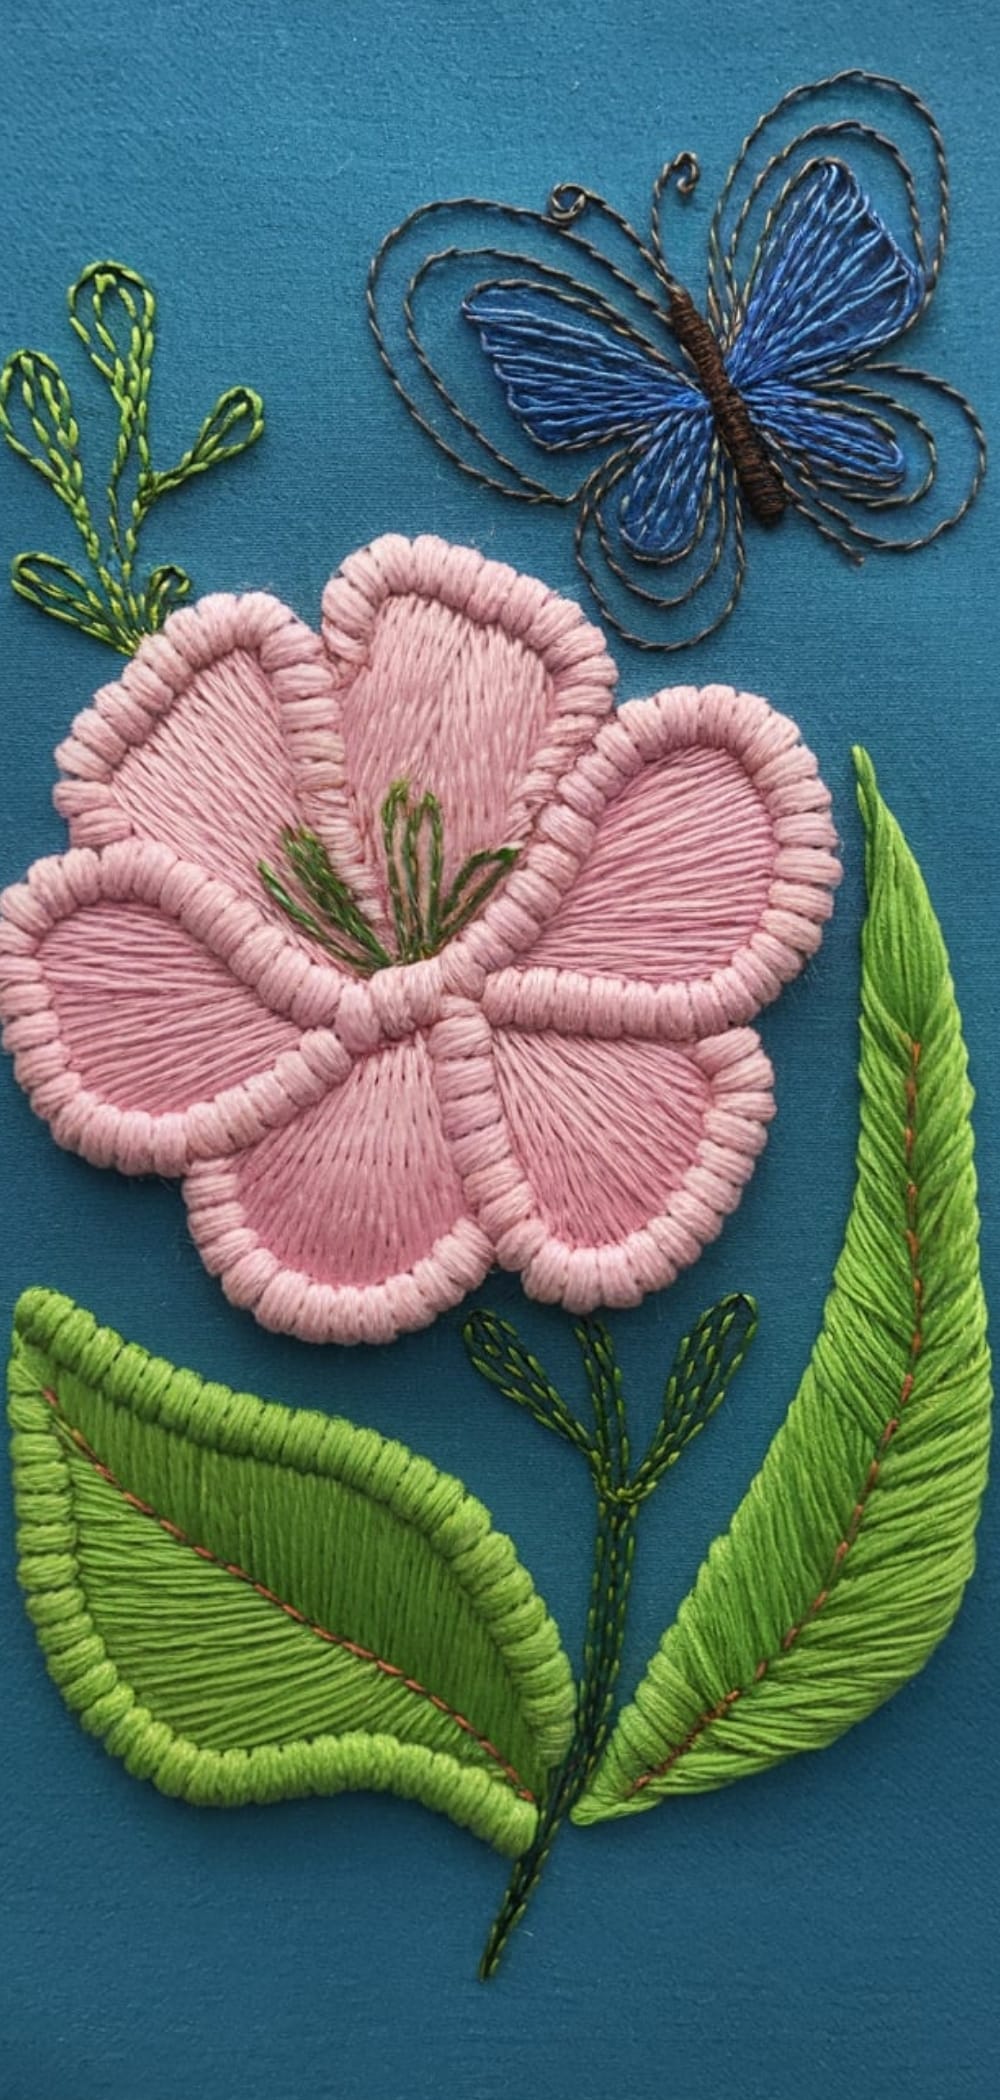
15. Botanical Embroidery Art with Dimensional Stitching
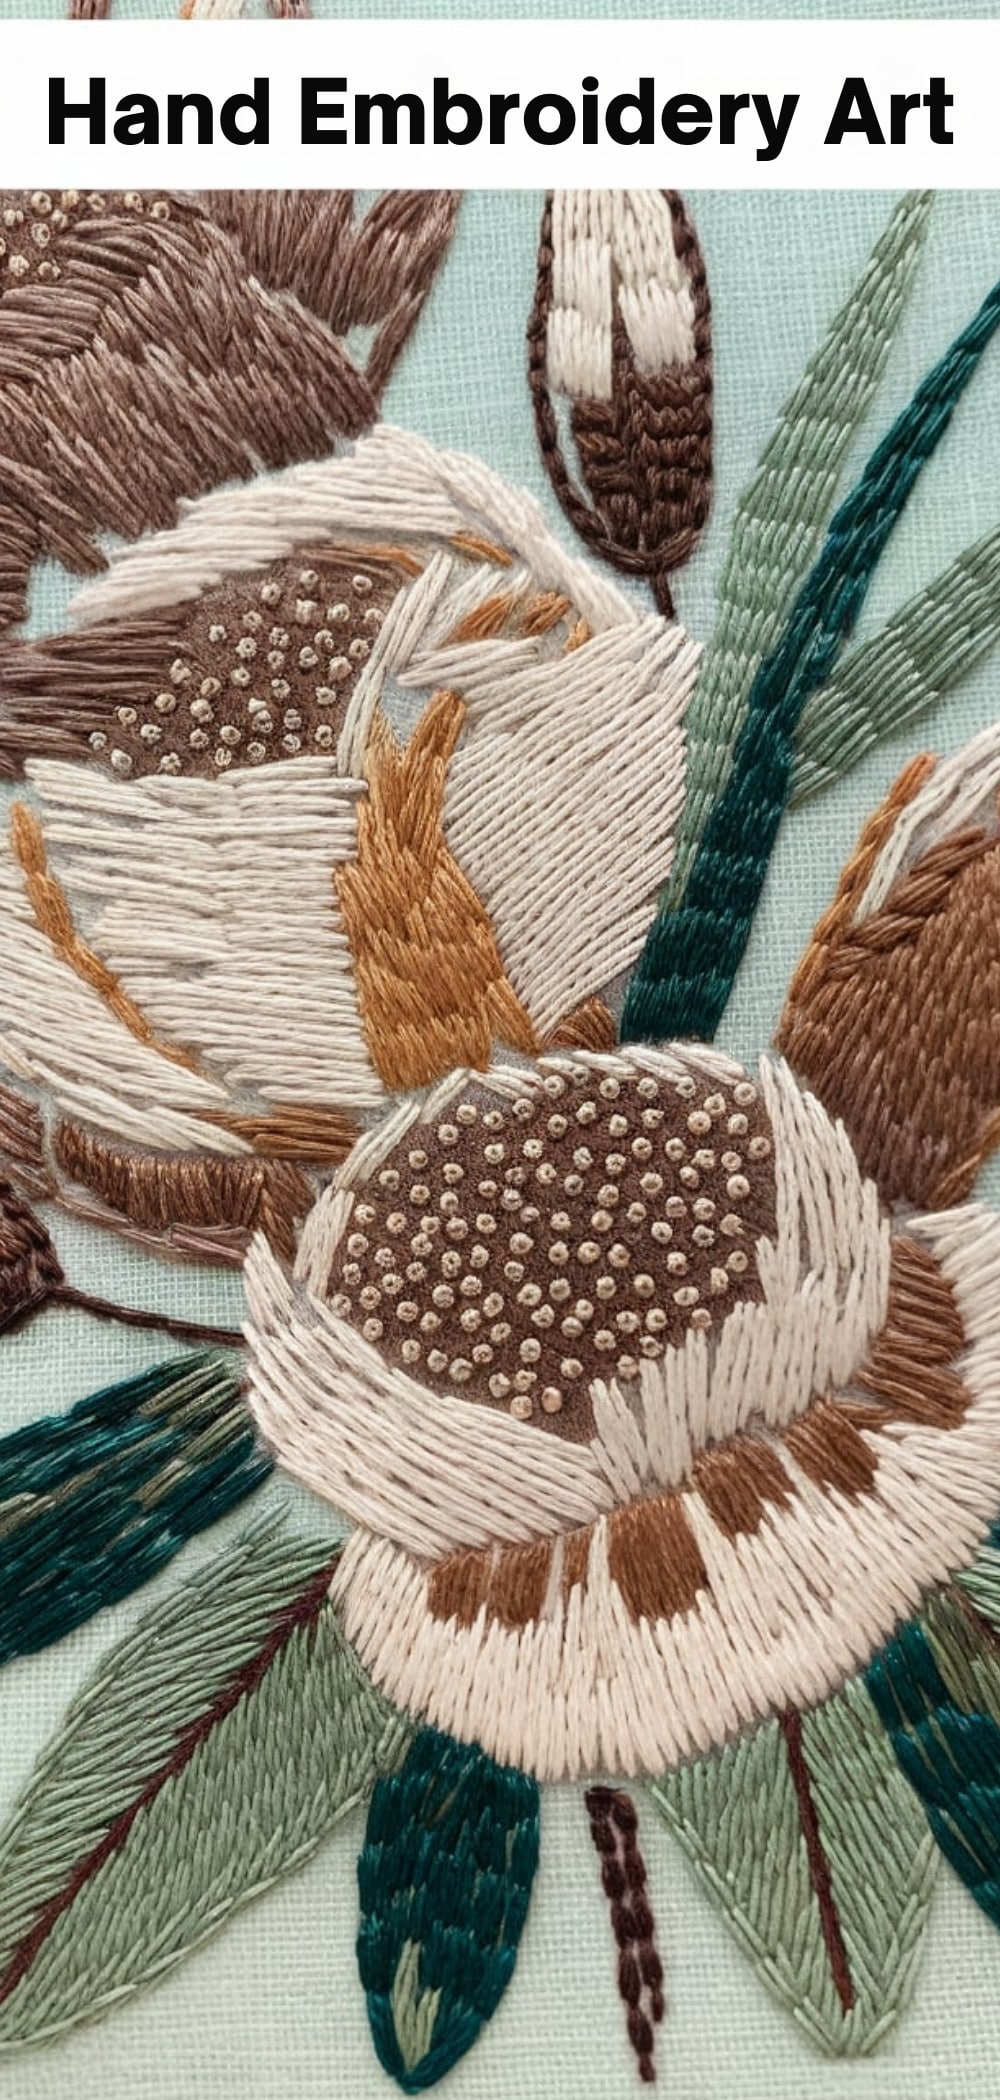
Incorporate layered stitches to create depth and realism in embroidered flowers and foliage. Use long and short stitches, French knots, and satin stitches to mimic the natural textures of petals and leaves.
Pro Tip: Use variegated threads for a more lifelike appearance and blend multiple green shades for foliage to avoid flatness.
14. Anatomical Embroidery Art: Heart, Brain, and Beyond
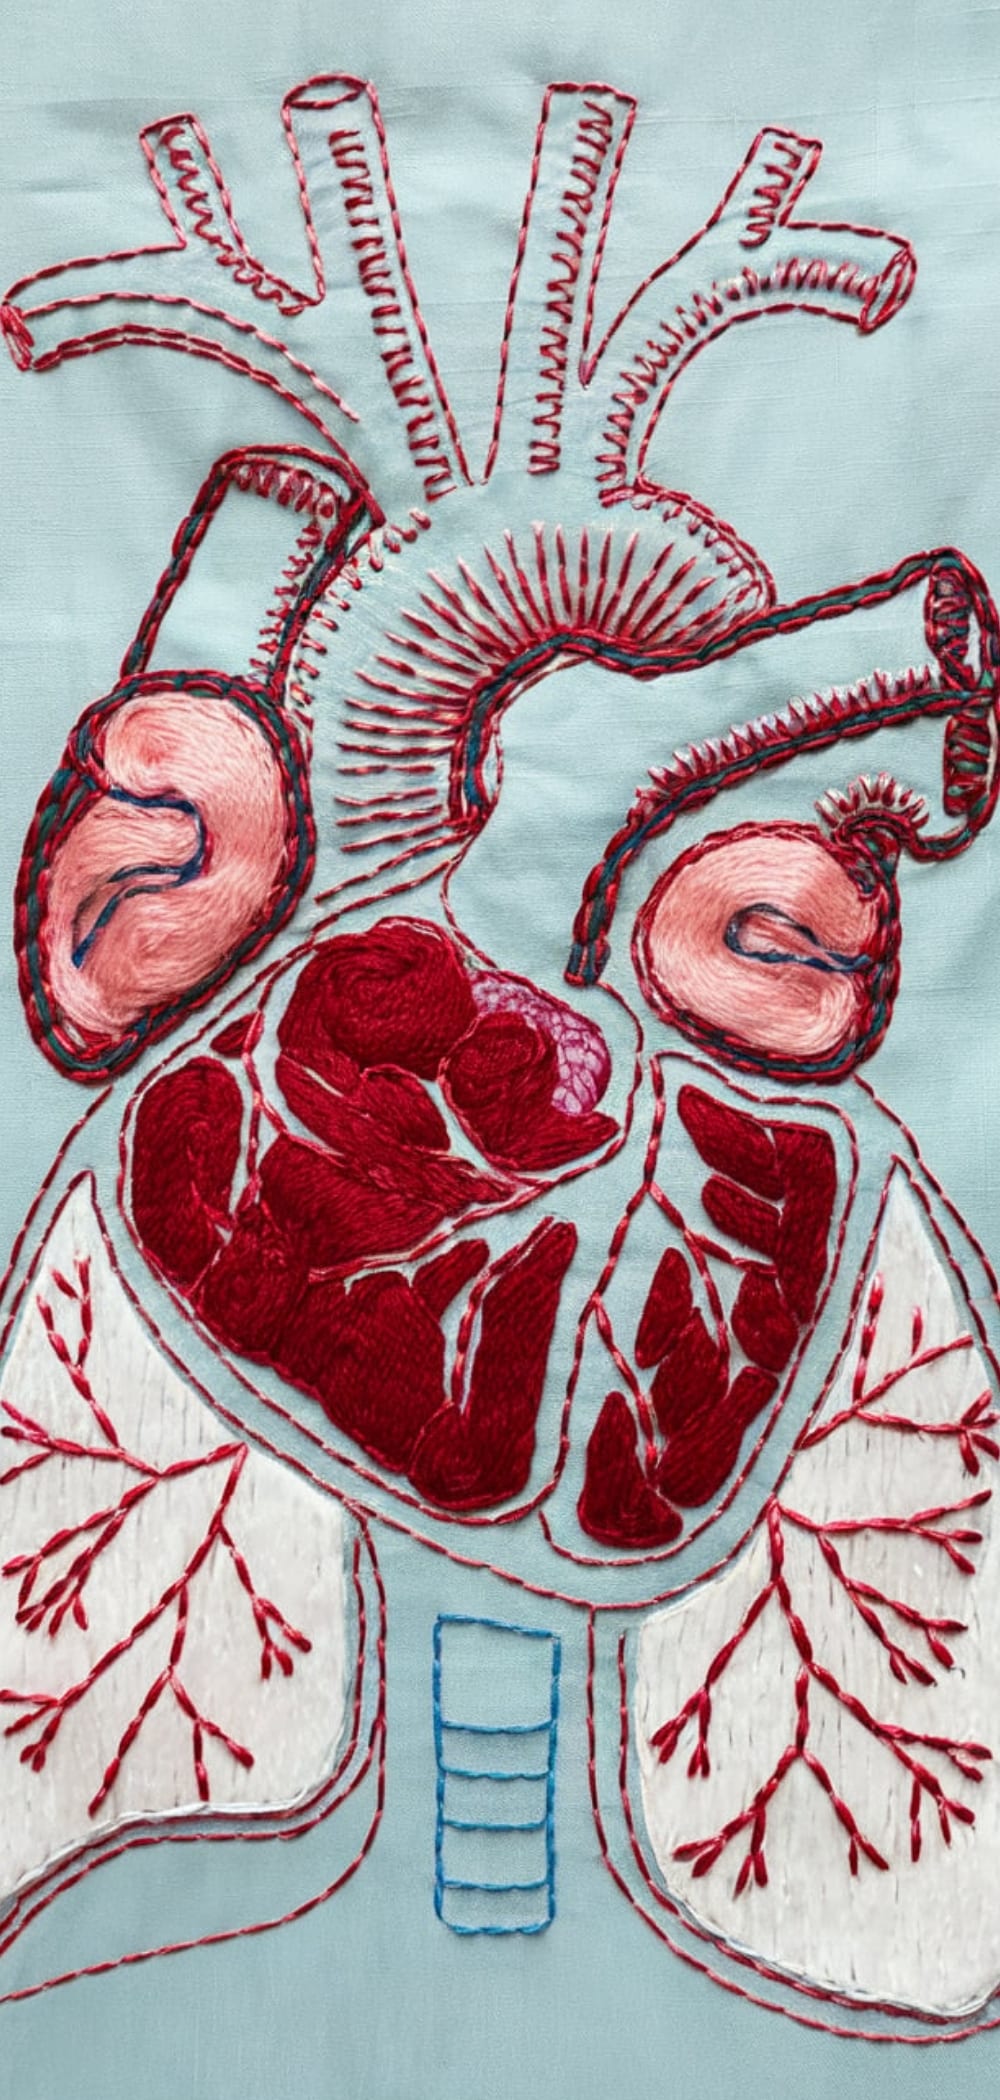
Stitch detailed human anatomy using clean satin stitches and bold outlines. Hearts, lungs, and neurons offer high-contrast visuals and symbolic weight.
Pro Tip: Combine red, burgundy, and pink floss for realistic vascular tones. Add backstitch borders to create clarity in complex designs.
13. Landscape Embroidery Art: Mountains, Oceans, and Skies
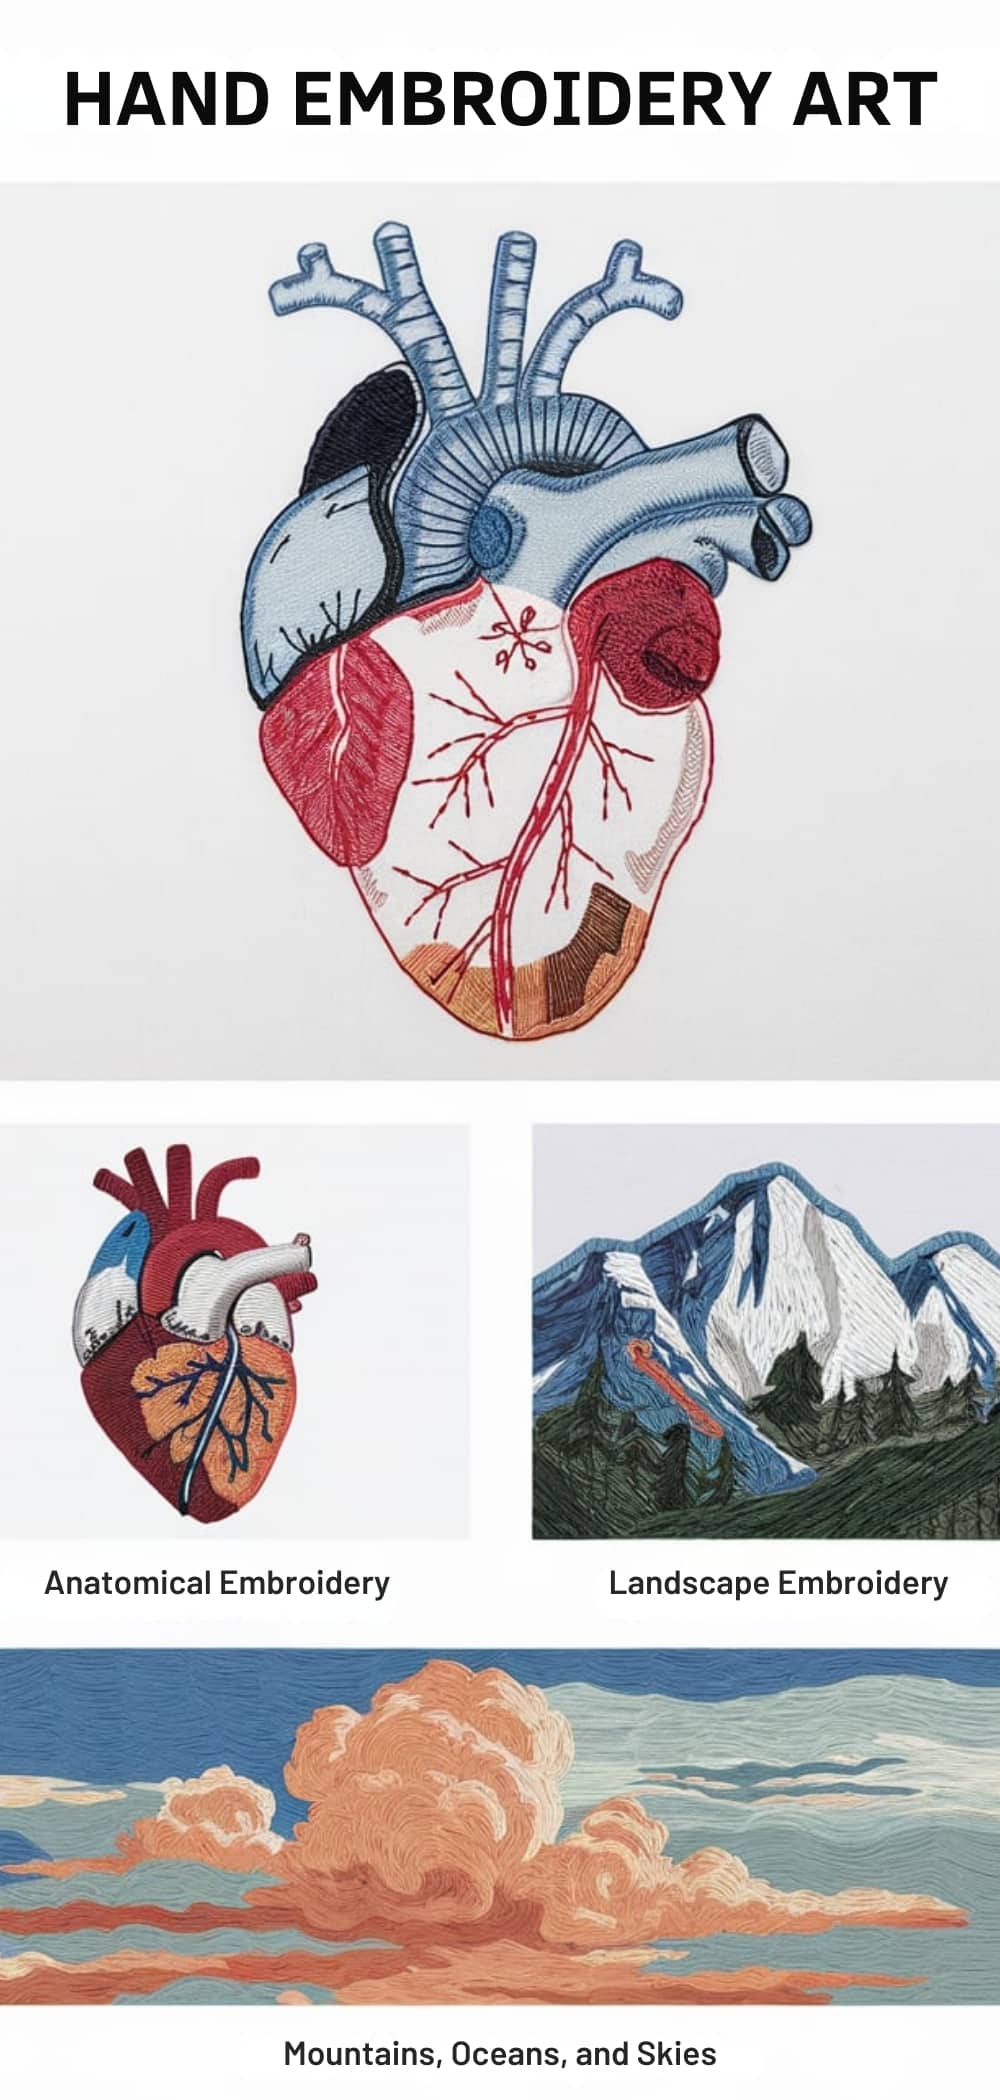
Recreate scenic vistas using layered horizontal stitches. Incorporate split stitch for outlines, French knots for texture, and ombré thread for sunsets or water gradients.
Pro Tip: Use hoops as permanent frames and vary thread thickness for perspective, with thicker threads in the foreground, finer ones in the distance.
12. Celestial Motifs: Stars, Constellations, and Planets
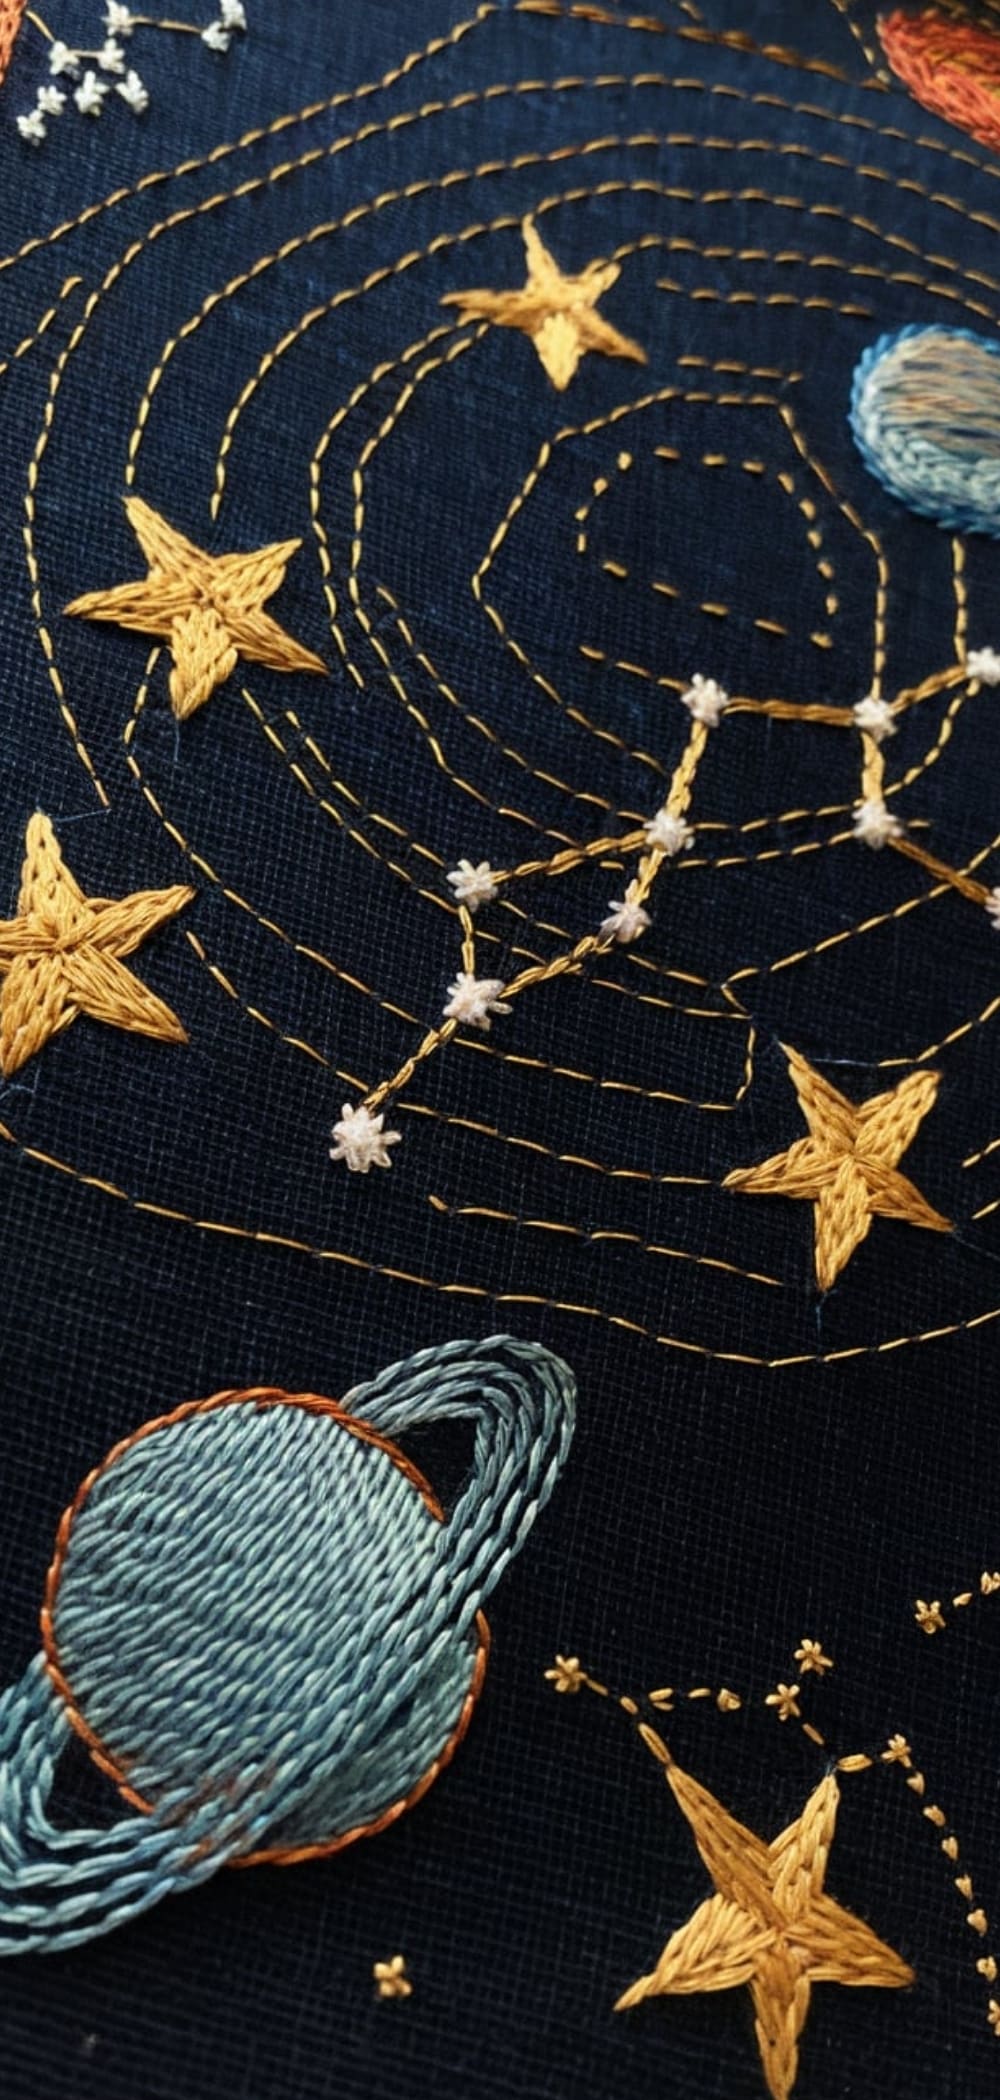
Embroider constellations with metallic threads on dark linen. Use seed stitches for stars and couching for orbit lines.
Pro Tip: Combine glow-in-the-dark thread with deep navy backgrounds for magical nighttime scenes.
11. Mixed Media Embroidery Art on Fabric Collage
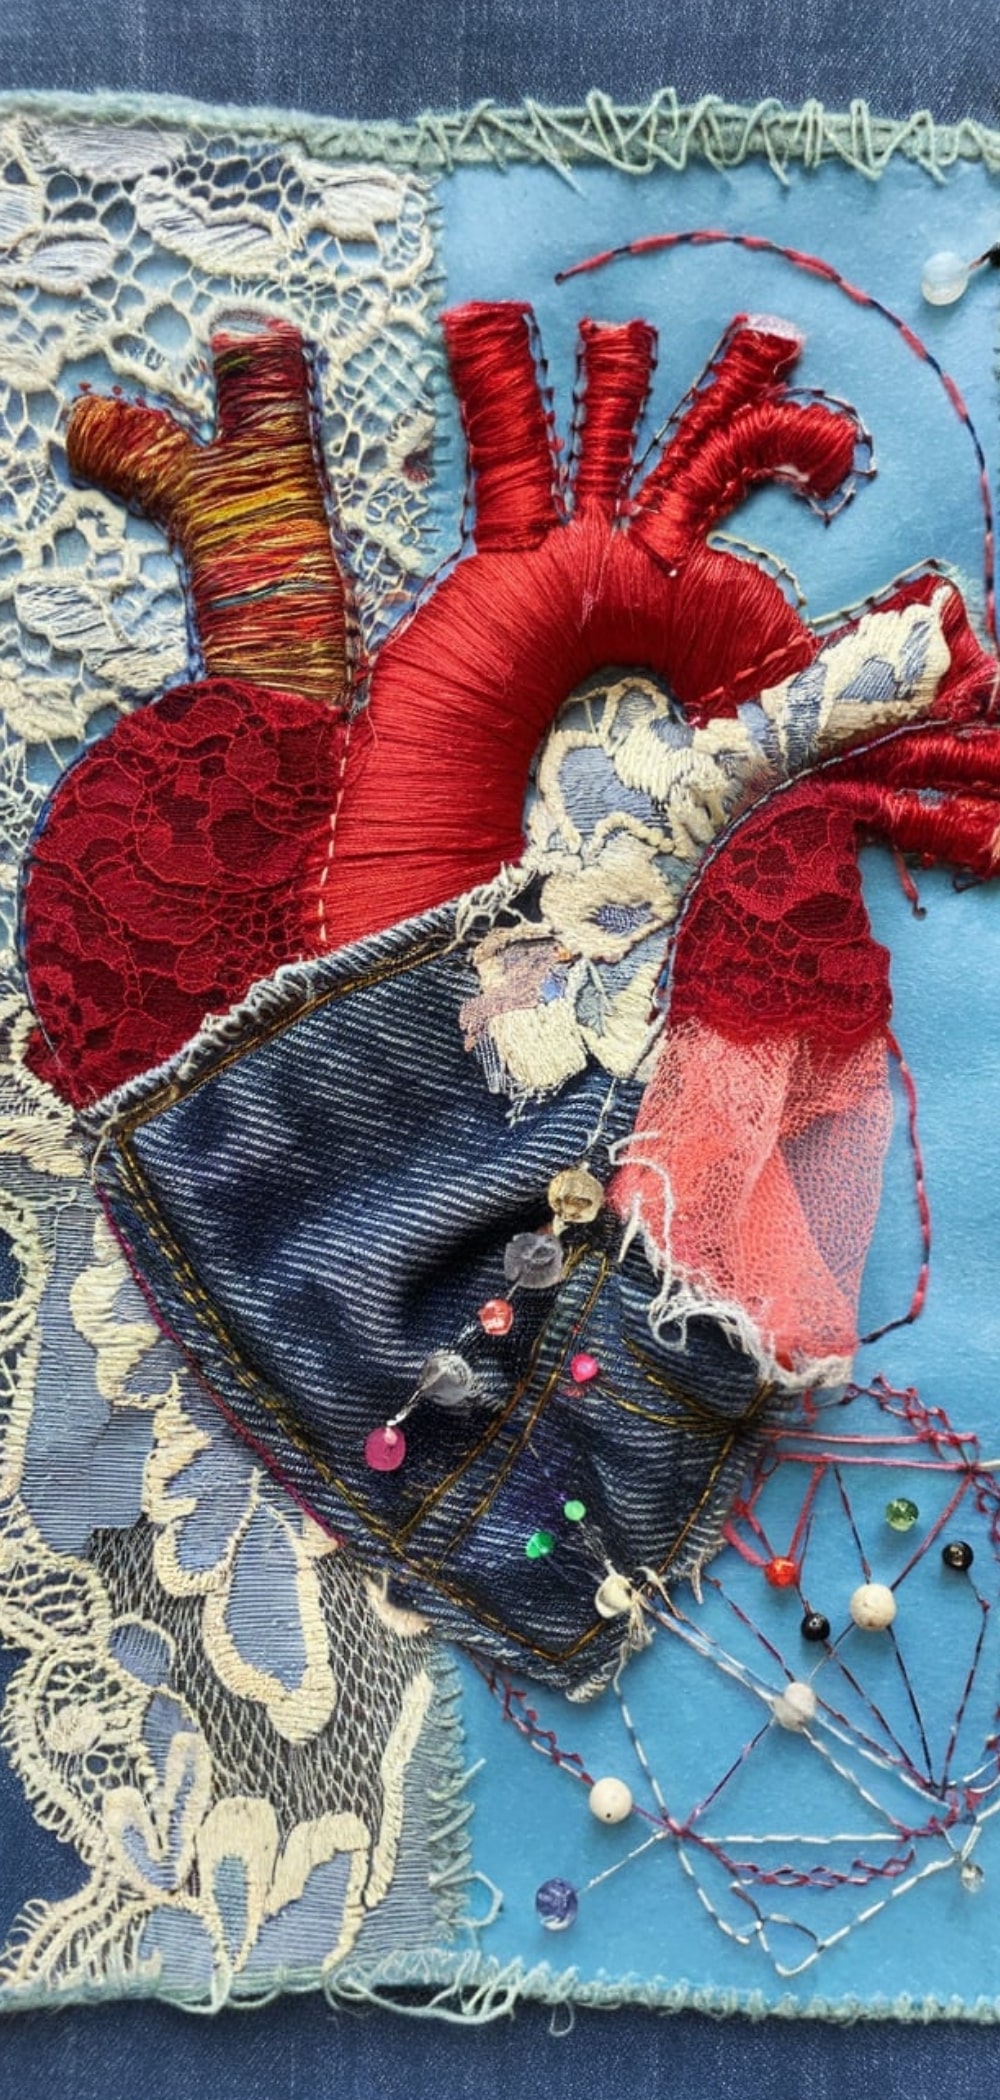
Integrate fabrics like lace, denim, and tulle beneath your stitches for tactile, mixed-media effects. Stitch over raw edges and add dimension using beads or appliqué.
Pro Tip: Stabilize your base fabric with interfacing to support heavier textures and embellishments.
10. Text and Typography with Bold Lettering
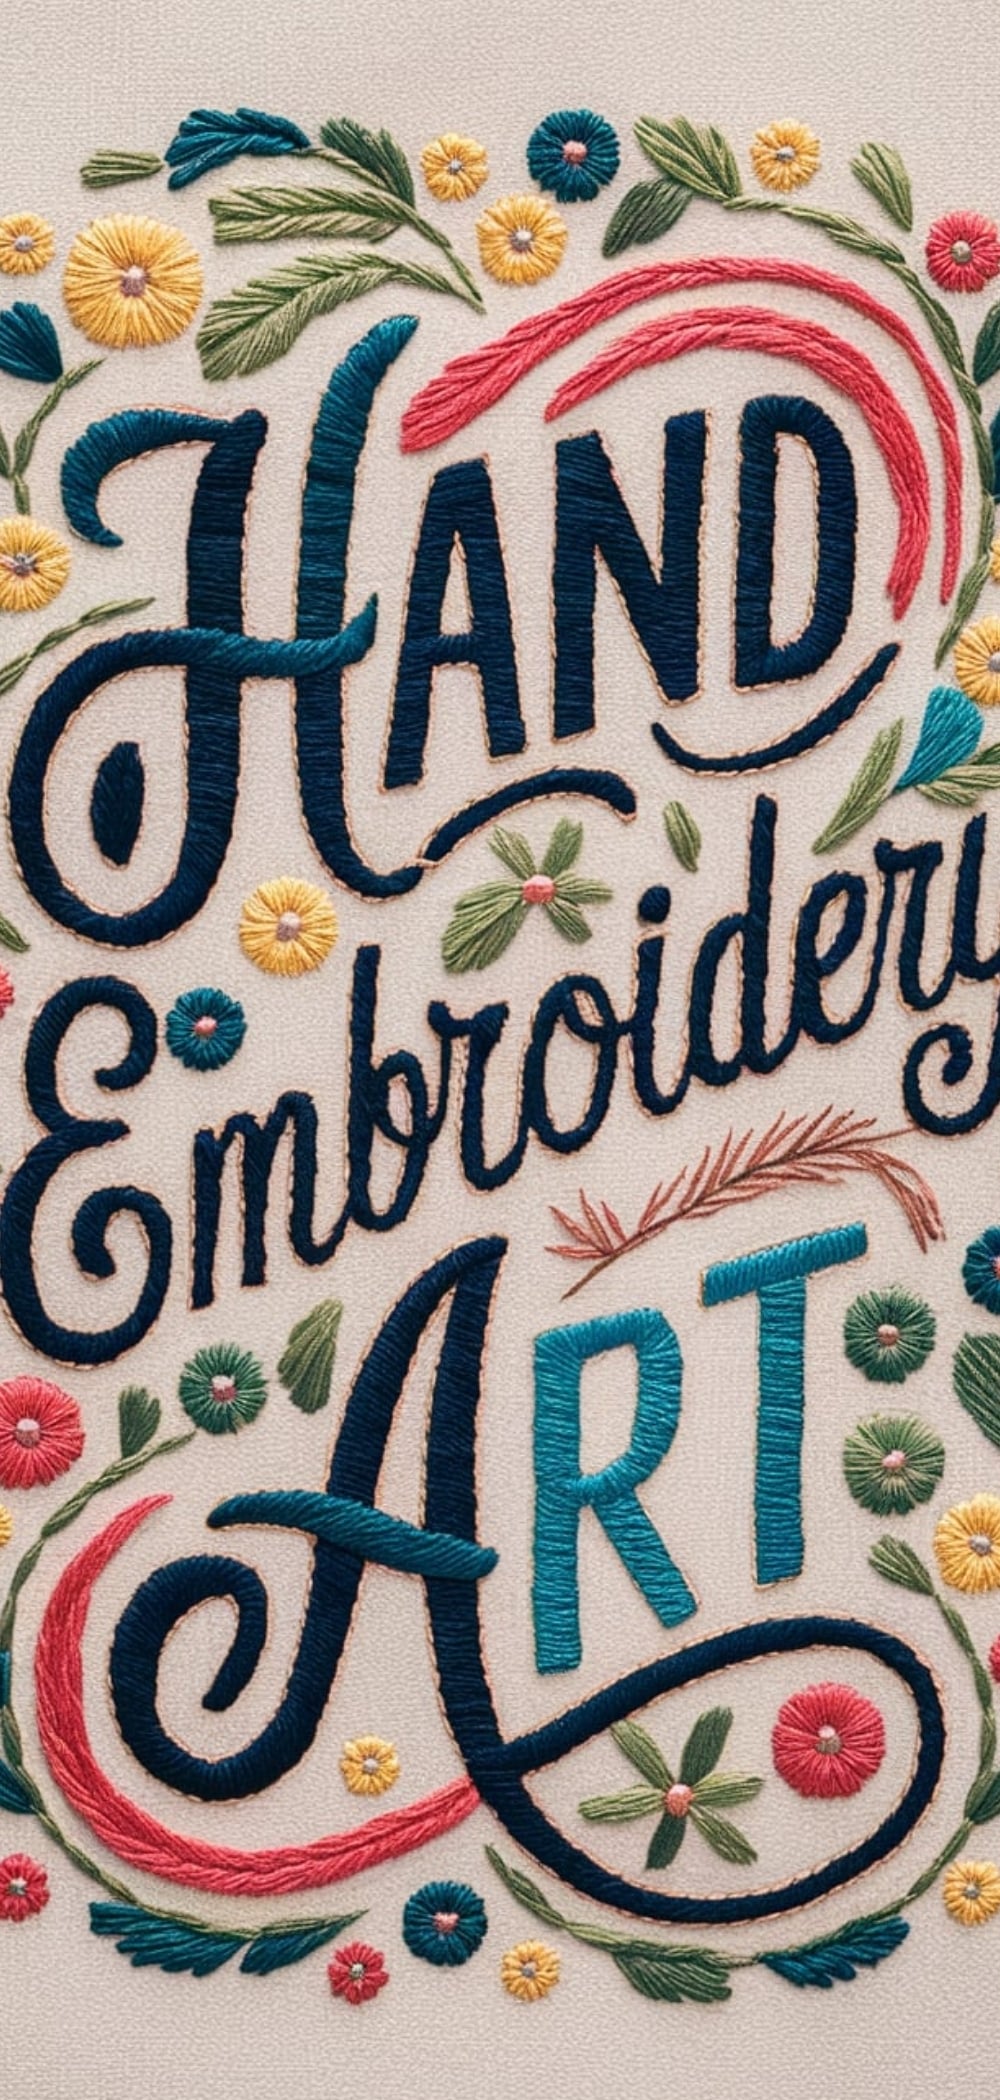
Create statement embroidery using large block or script letters. Use split stitch or stem stitch for cursive fonts and backstitch for precision in block text.
Pro Tip: Outline your design with a water-soluble pen and test fonts on paper before stitching to ensure alignment.
9. Insect Embroidery Art with Beaded Details
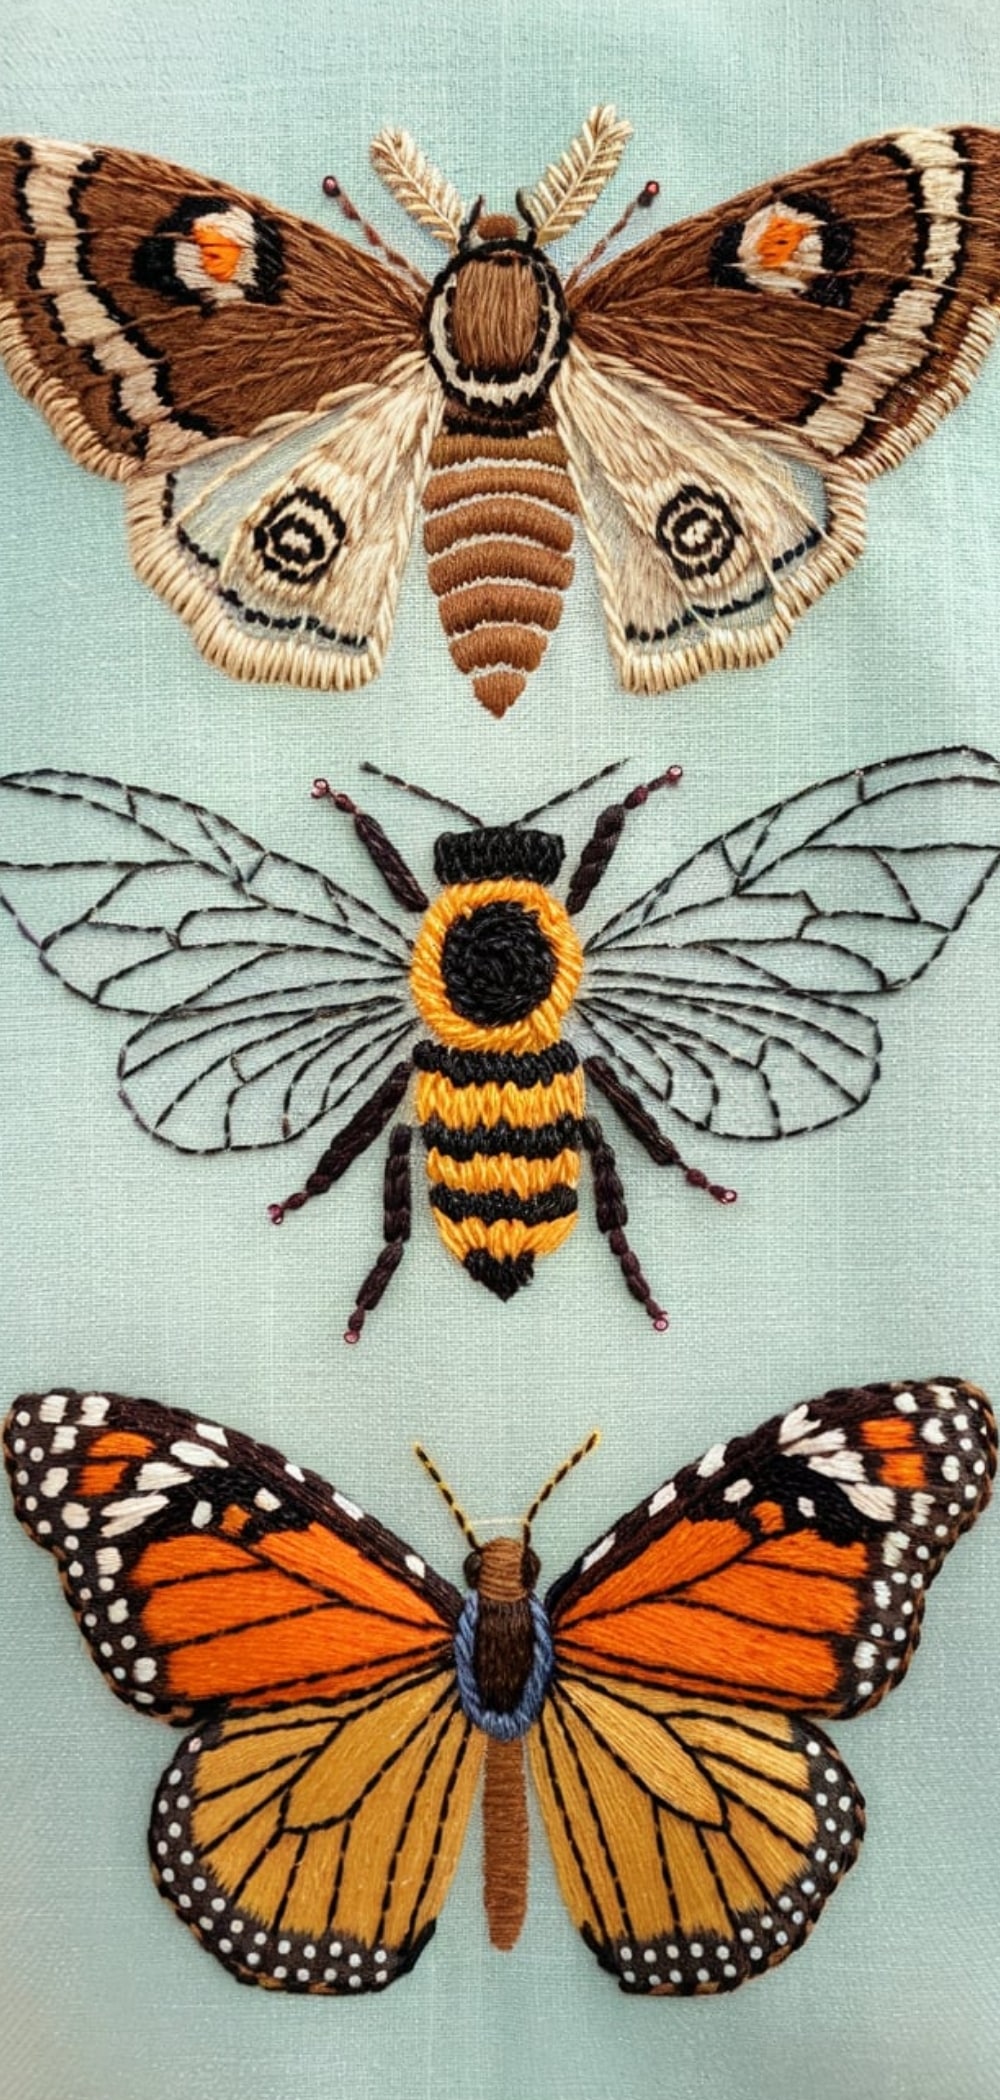
Stitch moths, bees, and butterflies using satin stitches for wings and beads for thoraxes and antennae.
Pro Tip: Use metallic thread for wing veins and layer with organza or mesh for a realistic shimmer effect.
8. Portrait Embroidery Art: Stylized Human Faces
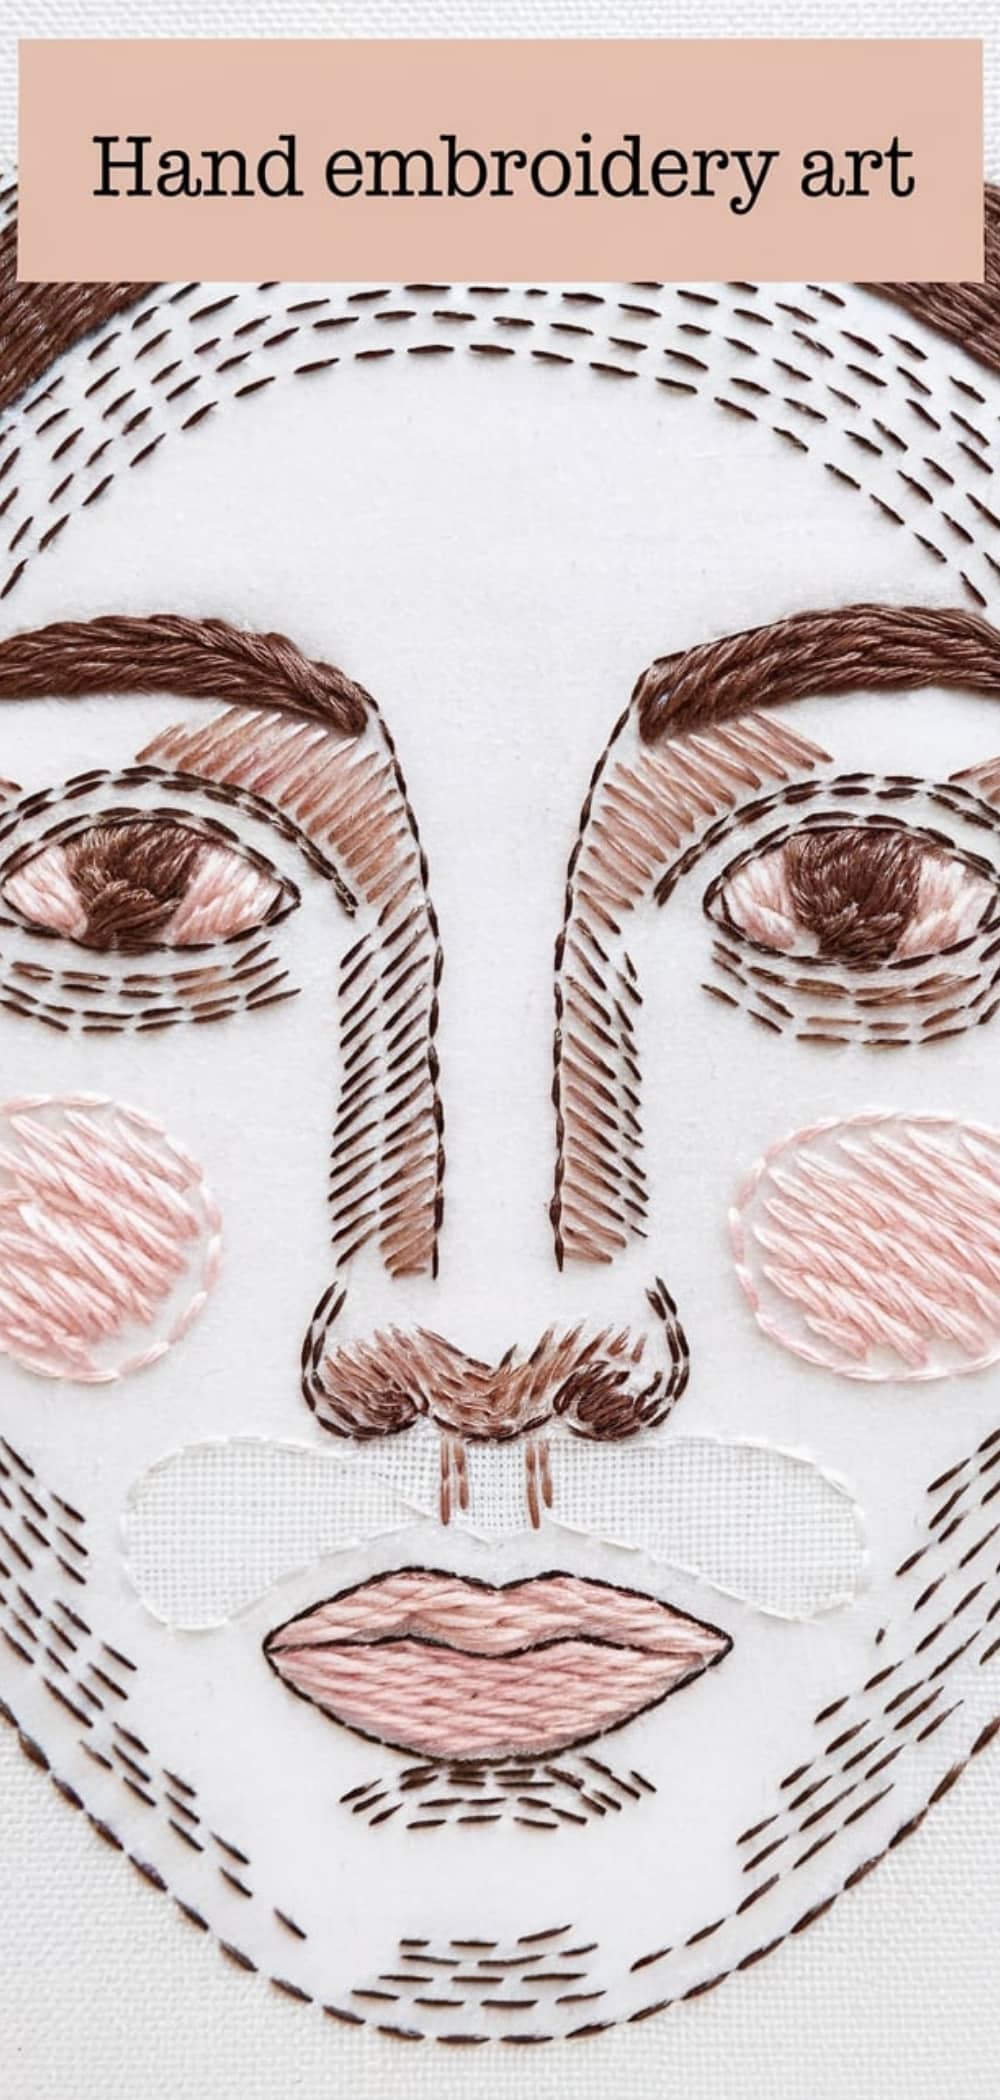
Capture facial features with split stitch for outlines and long-short stitch for skin tones. Use French knots for pupils and subtle blush thread tones for cheeks.
Pro Tip: Keep proportions accurate by transferring photo-based sketches using transfer paper or soluble pens.
7. Geometric Patterns with Color Blocking
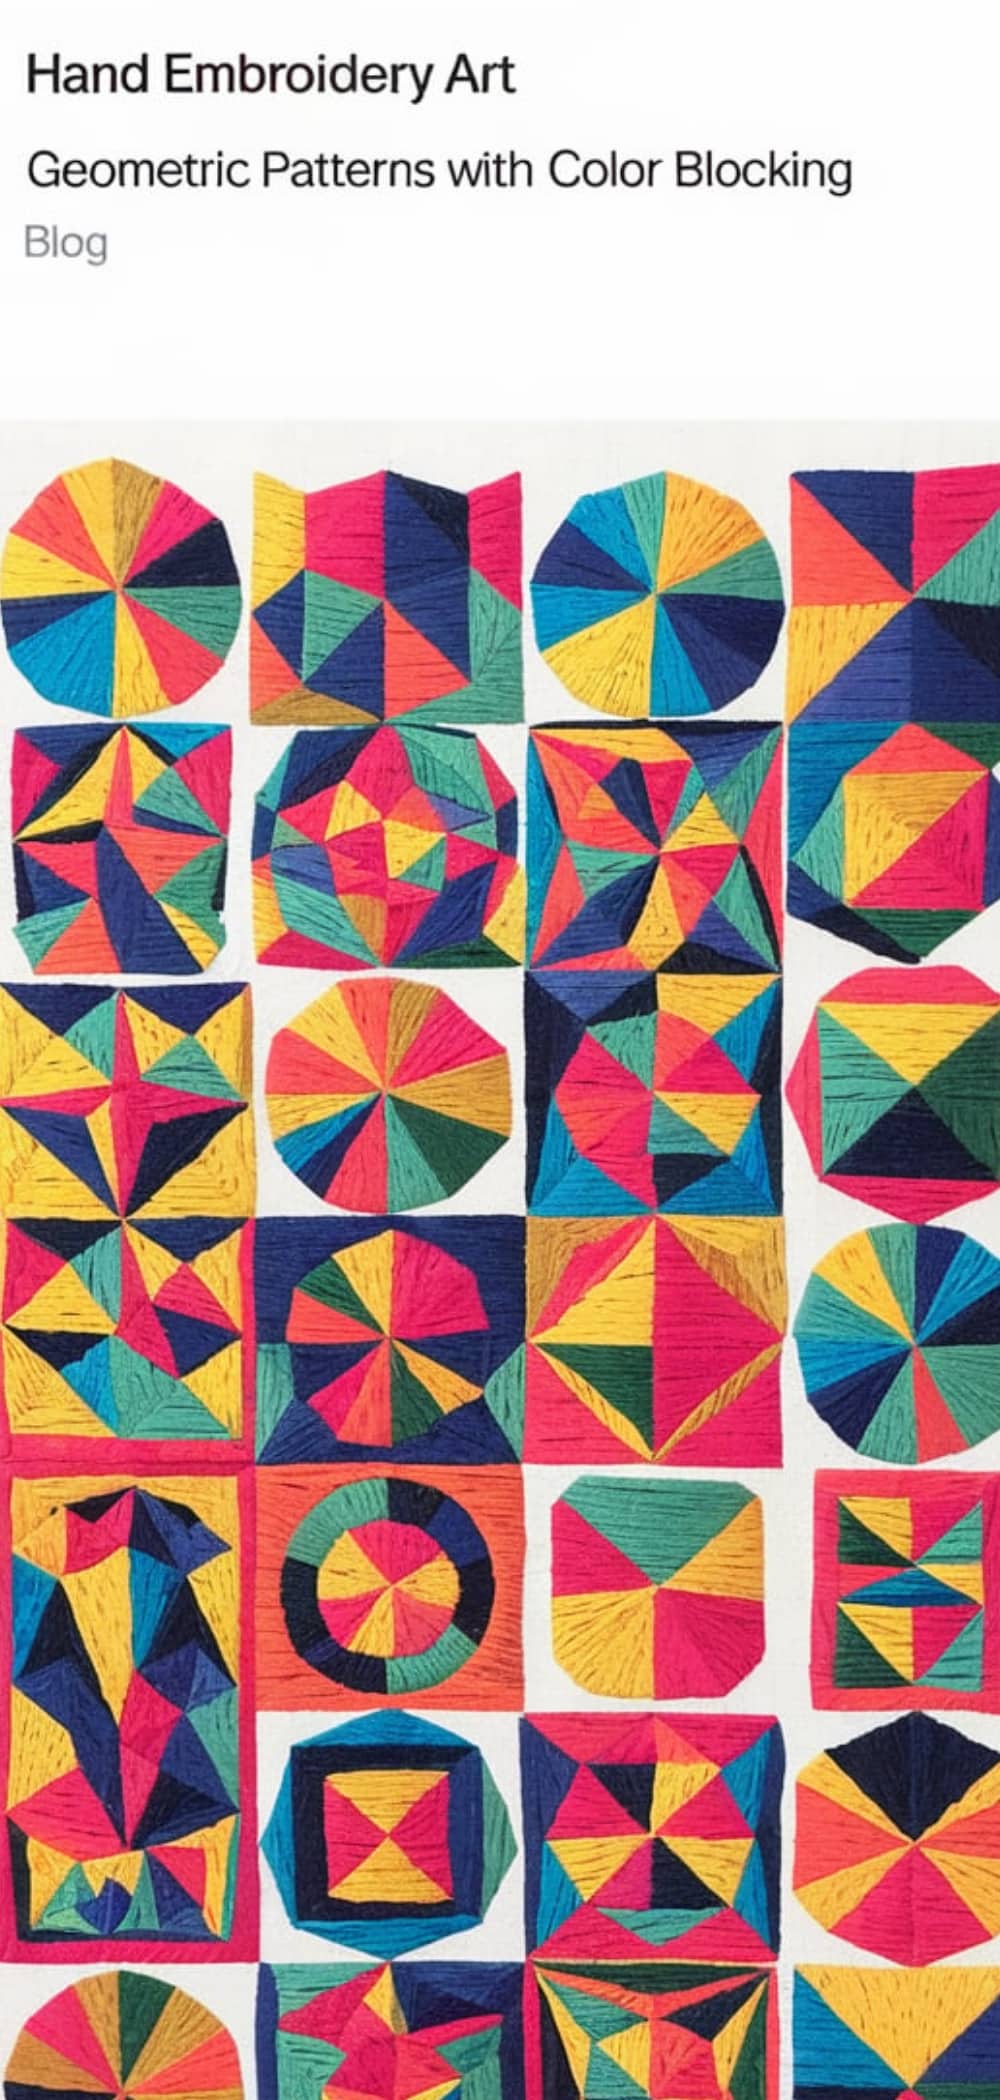
Design triangles, circles, or hexagons using vibrant color palettes. Use satin and brick stitches for solid fill areas and backstitch for precision outlines.
Pro Tip: Mark a grid on the fabric for symmetrical placement and use contrasting thread for visual impact.
6. Architectural Embroidery Art of Buildings and Skylines
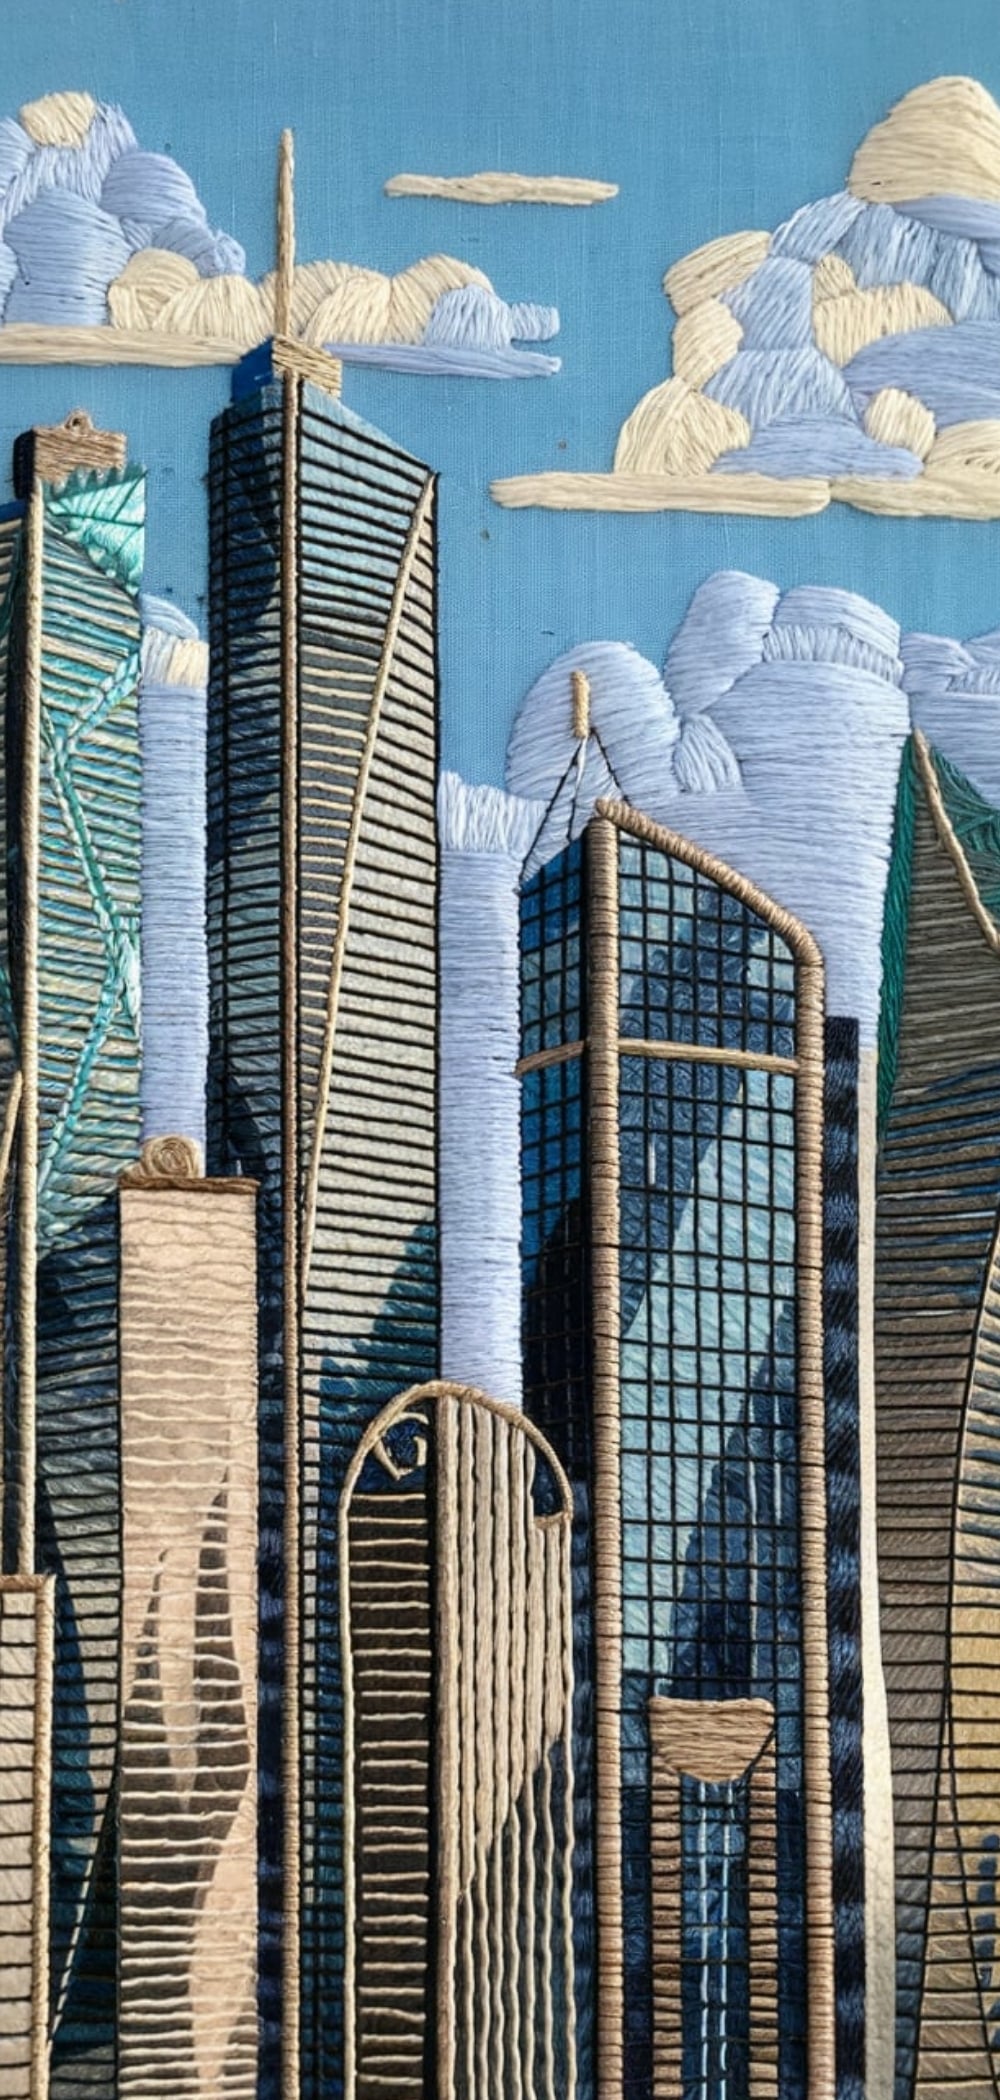
Recreate urban scenes with straight stitch for walls, fly stitch for windows, and chain stitch for ornate arches or rooftops.
Pro Tip: Print reference photos and convert them into line art before transferring to fabric for accuracy.
5. 3D Embroidery Art with Raised Techniques
Add dimension with stumpwork, wirework, and padded stitches. Ideal for florals, insects, and accessories.
Pro Tip: Use felt padding beneath stitches and wire to mold shapes like wings or leaves that stand off the fabric.
4. Animal Embroidery Art with Fur Texturing
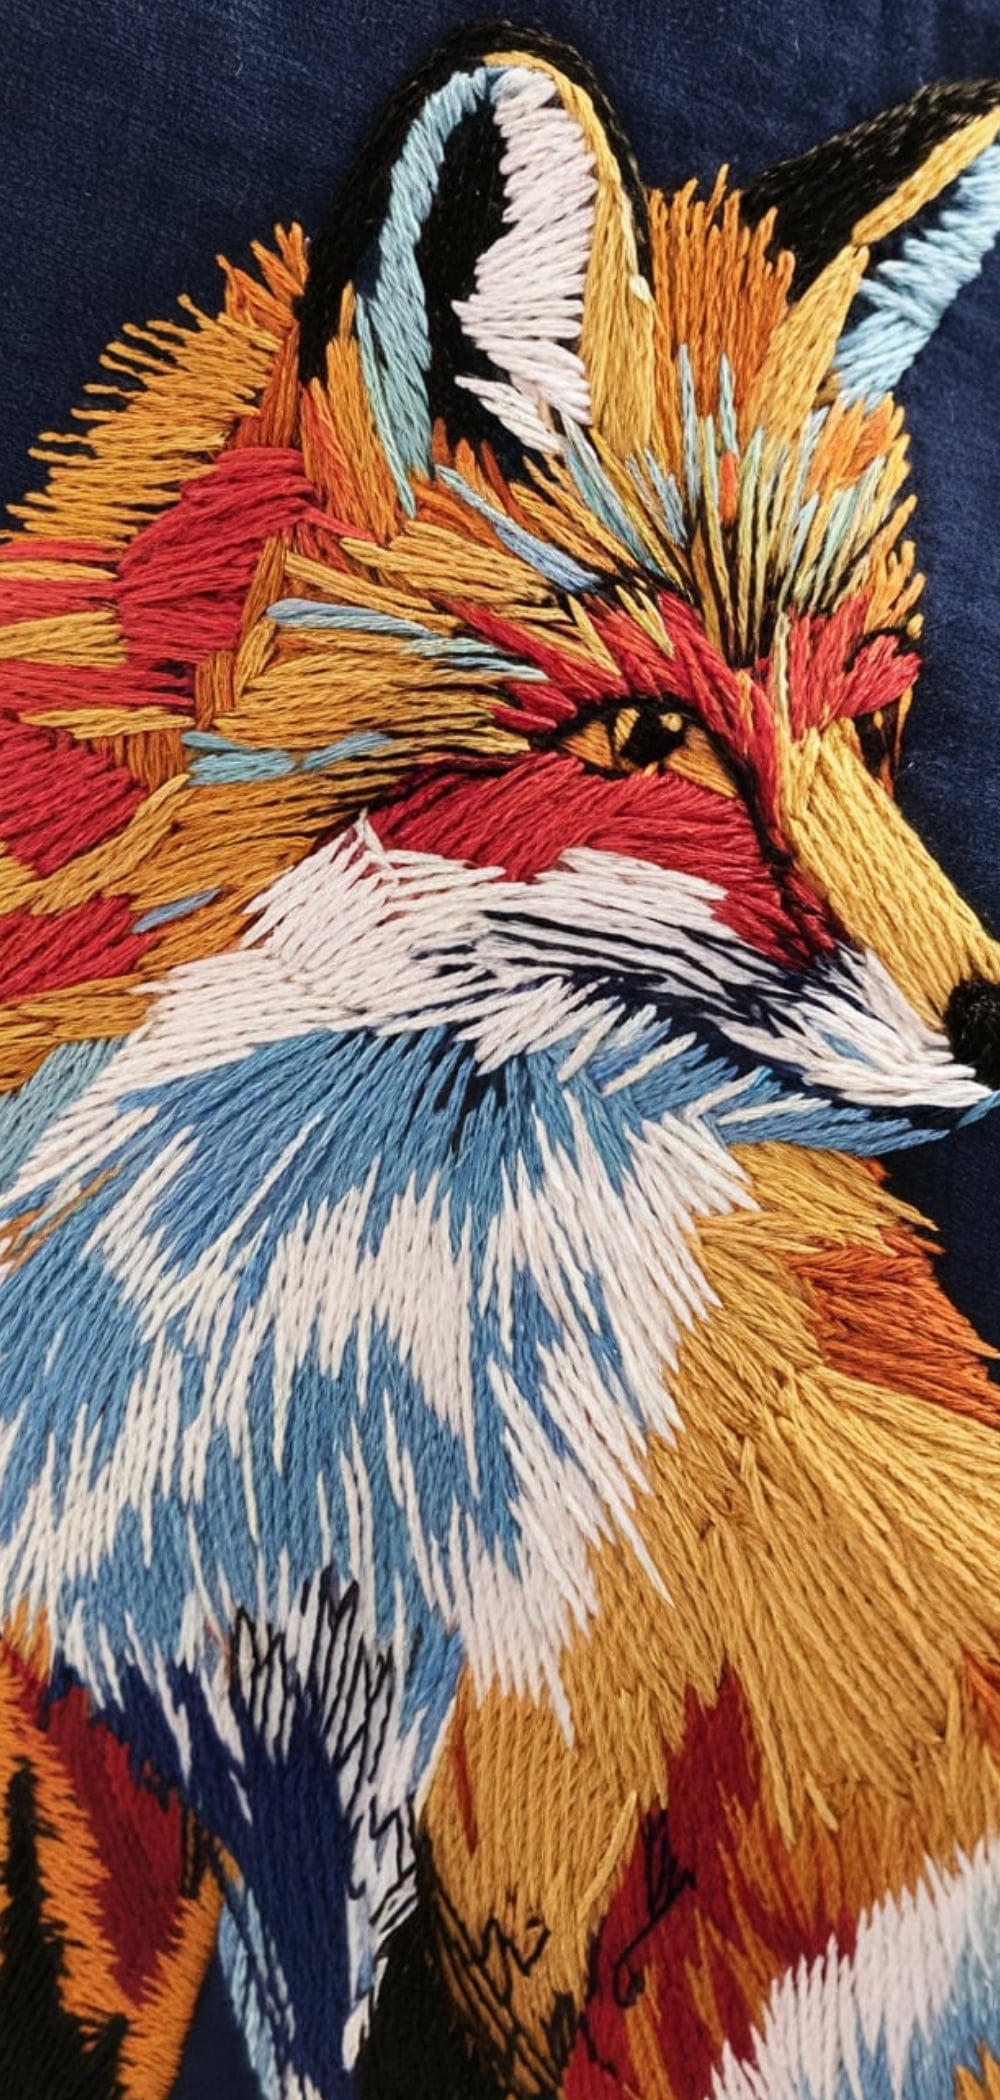
Use long and short stitches in varied directions to mimic fur. Layer stitches and mix thread weights to add realism.
Pro Tip: Stitch in the natural direction of fur growth. Use at least three shades per color zone for depth.
3. Cultural Motif Embroidery: From Mandalas to Tribal Patterns
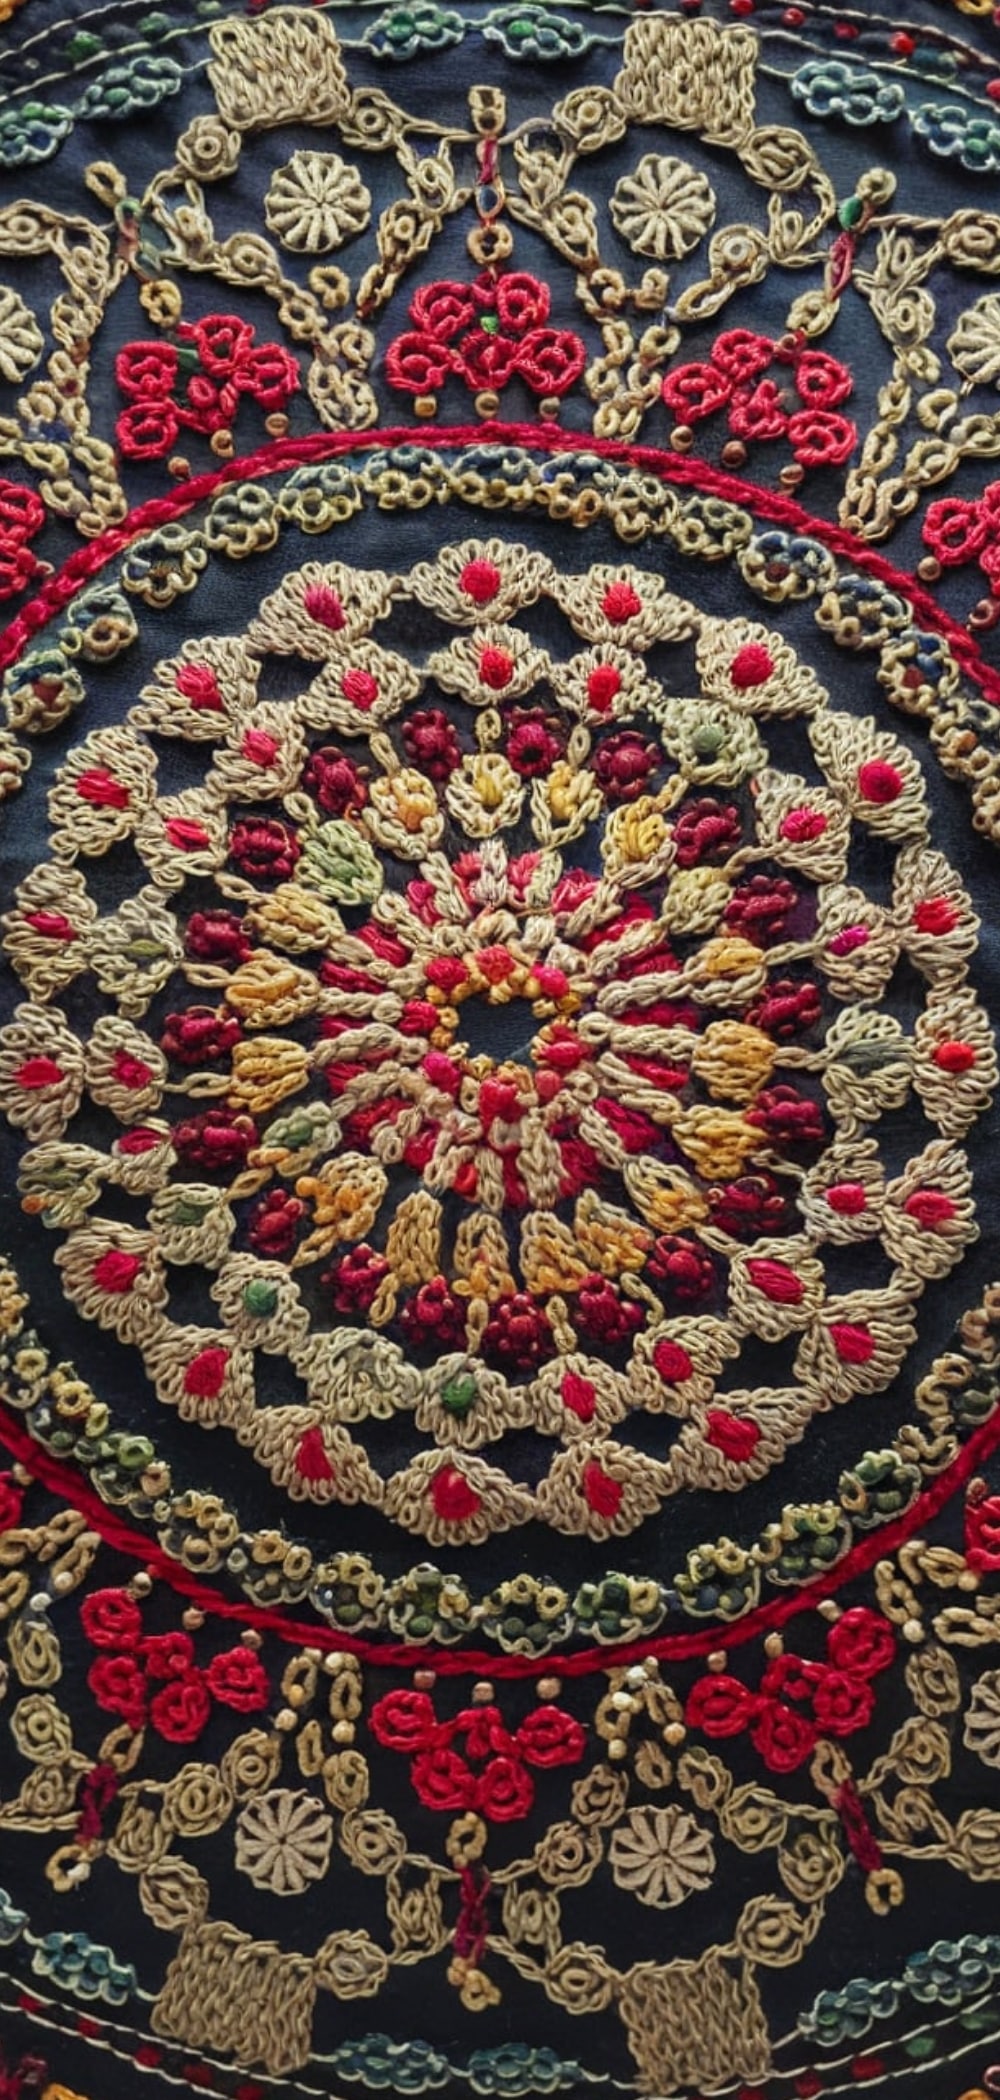
Embrace geometric and radial symmetry. Use mirror stitch, chain stitch, and beading to mimic ethnic textile patterns.
Pro Tip: Choose patterns from historical sources or local cultures and adapt them with a modern thread palette.
2. Abstract Embroidery with Freeform Stitches
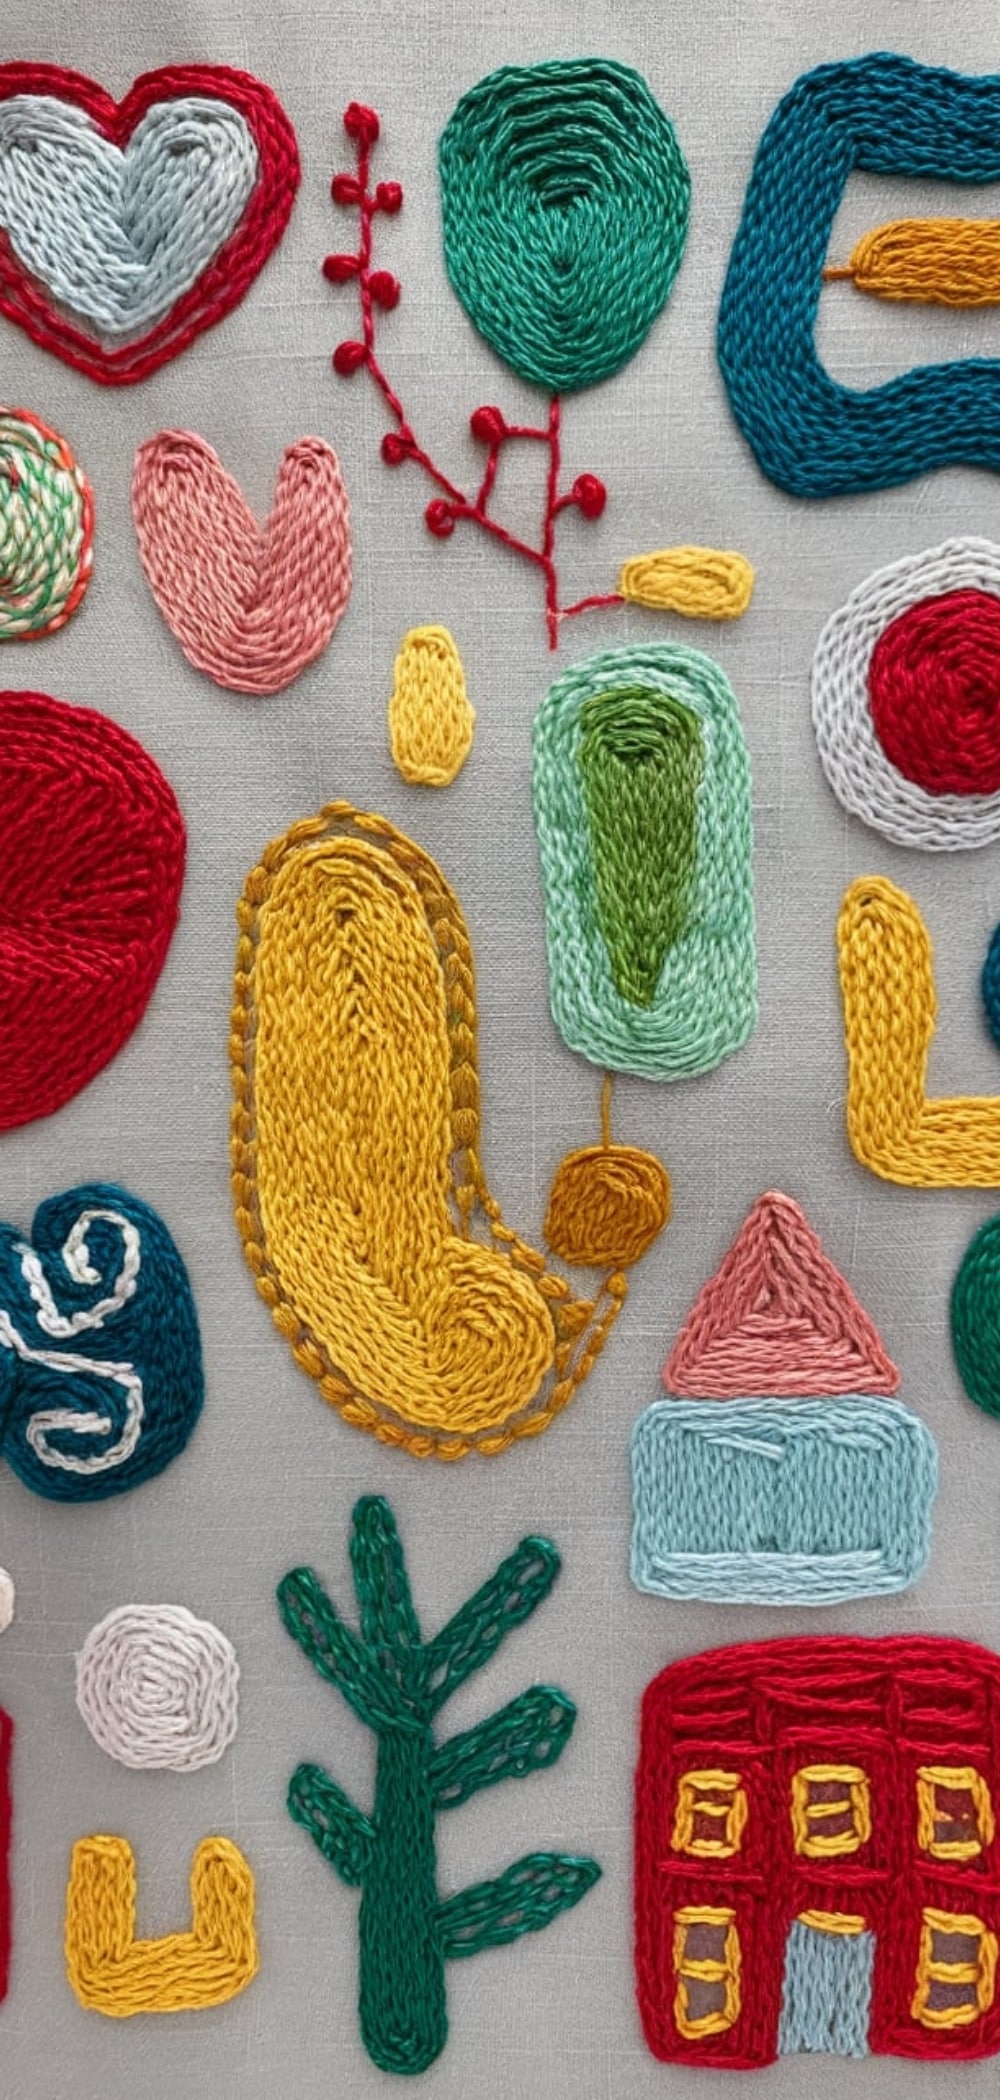
Let creativity lead with experimental shapes and textures. Combine couching, seed stitch, French knots, and whip stitch.
Pro Tip: Draw organic lines directly onto fabric and allow the design to evolve intuitively without strict guides.
1. Minimalist Embroidery with Negative Space

Less is more. Use clean lines, one-color thread, and intentional space to focus the eye on form and balance.
Pro Tip: Embroider on neutral linen or canvas and frame in natural wood hoops for a gallery-ready aesthetic.
Conclusion
By mastering these diverse embroidery art techniques and applying thoughtful material choices, creators elevate their practice from simple stitching to gallery-worthy masterpieces.


[…] followed my blog for a while, you know I’m always trying out new hobbies. From crochet to embroidery, and even clay projects, if it looks fun, I’ll probably give it a […]