Make sure to join my list for Weekly Tips and Recipes to Your Inbox
Braids For Beginners I Keep Coming Back To For School Morning Hair

A little note: Some images in this post may come from third-party sources and are shared purely to inspire you. All credit goes to their original creators. Visit our Image Credits Policy for more information.
I sat on the bathroom floor with my daughter between my knees, hairbrush in one hand and my phone propped against the mirror playing a slow-motion tutorial. Braids had defeated me more times than I could count by that point in the school year.
My fingers kept losing the pattern halfway through every single attempt. I would get three sections crossed cleanly, then somehow lose track of which strand went where and end up starting completely over.
I had watched enough videos to feel like I understood the theory. The actual doing was a different story entirely, especially with a wiggly five-year-old who had opinions about how long this was taking.
I finally stopped trying to learn every braid style at once and picked just one to actually master. That single decision changed everything about how braids felt in my hands.
I started practicing on a doll first, then on my own hair in the mirror, before ever touching my daughter’s again. It felt silly, but slowing down that way built the muscle memory I had been missing.
I noticed something once I stopped rushing. Braids are really just repetition, the same three moves over and over, and once your hands learn the rhythm, your brain stops having to think so hard about it.
I kept a running list of the styles that made the whole learning curve feel manageable, the kind I would genuinely show a friend just starting out. Every idea below came from that list, tested on real hair during real, sometimes rushed mornings. These are the ones that finally clicked.
What We're Exploring
- 01 Colorful Braiding Hair Turns A Basic Dutch Braid Into A Fun Project
- 02 The Mega Mom Moment
- 03 Classic Dutch Pigtails Are The Perfect Starting Point For Any Beginner
- 04 A Braided Crown With Space Buns Adds Personality Without Extra Difficulty
- 05 A Half Up Braided Bun Gives Long Hair Structure Without Full Commitment
- 06 The Family Win Box
- 07 Two Braids Meeting At A Bow Create A Sweet Statement Style
- 08 Learning Dutch And French Side By Side Makes The Difference Finally Click
- 09 Why Braids Actually Get Easier With Repetition, Not Talent
- 10 The Real Talk Box
Colorful Braiding Hair Turns A Basic Dutch Braid Into A Fun Project
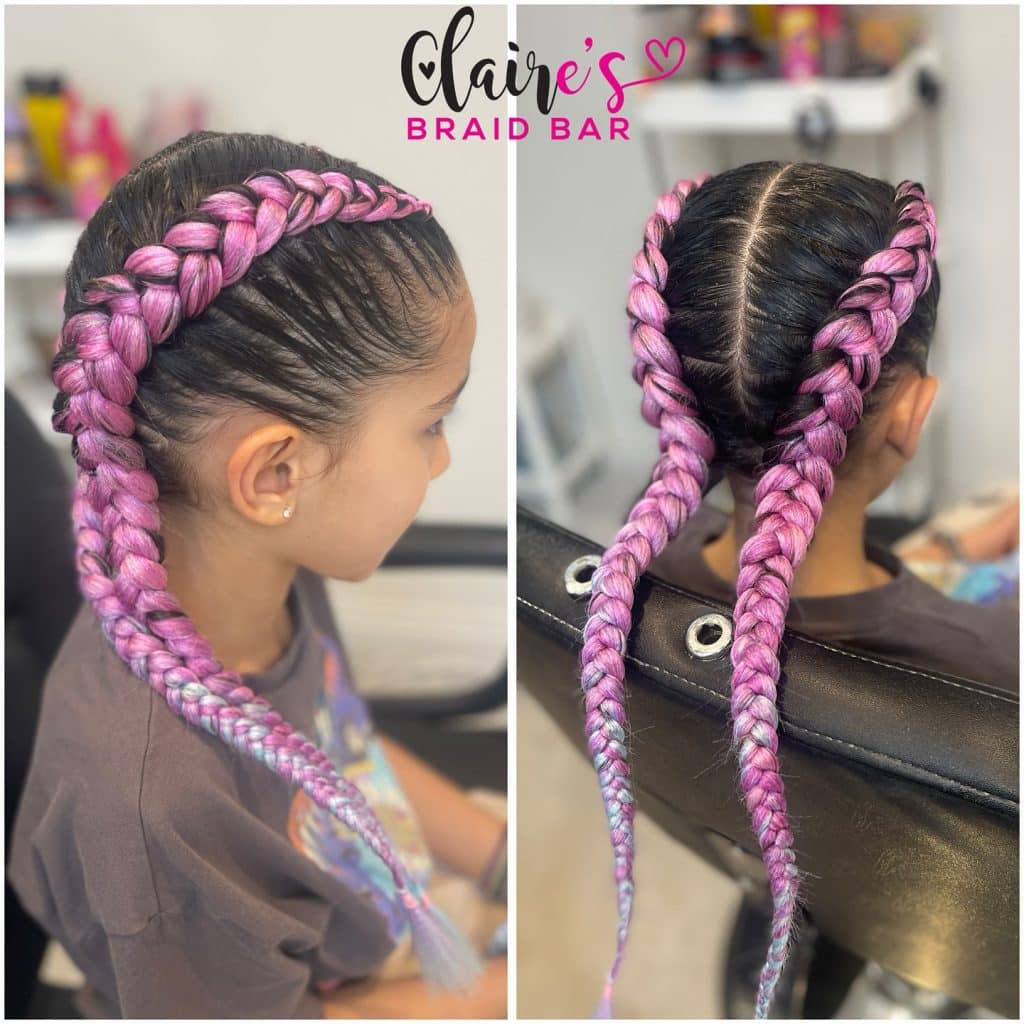
Adding a strand of colorful synthetic braiding hair into a simple Dutch braid is one of the most forgiving ways to practice braids while still ending up with something genuinely exciting. The bold color hides small mistakes in tension or spacing far better than natural hair alone ever could. That built-in forgiveness makes it a wonderful confidence builder for anyone just starting out.
Securing the braiding hair at the root with a small elastic before starting, a prep step often mentioned in braiding tutorials on Parents.com, keeps everything from slipping loose halfway through. That small setup step saves real frustration partway into the braid.
Budget Guide: Synthetic braiding hair extensions typically cost $6 to $15 per pack, and small elastics for securing ends run $3 to $6 at Sally Beauty or Amazon.
The Mega Mom Moment
I nearly gave up on braids completely after a solid month of lopsided pigtails and one very patient daughter. What actually worked was slowing down and practicing on my own hair first, away from an audience, until my hands finally understood the pattern without me having to think about it.
Classic Dutch Pigtails Are The Perfect Starting Point For Any Beginner
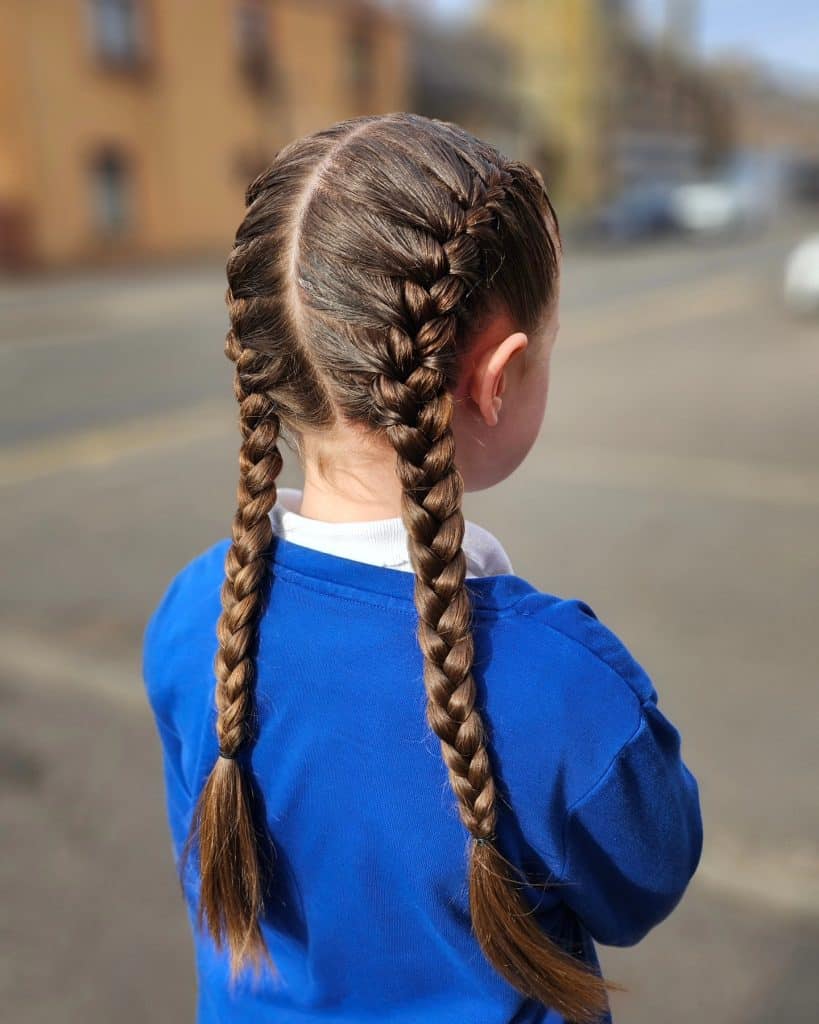
Two simple Dutch braided pigtails might be the single most practical braid style to master first, since the technique stays exactly the same on both sides once you learn it once. Dutch braids sit on top of the hair rather than underneath, which actually makes the crossing pattern easier to see and follow while you are still learning. That visibility matters more than people expect when you are just starting out.
Practicing the first few inches slowly before picking up speed, a tip often echoed in beginner hair guides on Good Housekeeping, helps the tension stay even throughout the whole braid. Rushing the start is where most early mistakes happen.
Budget Guide: A basic set of small hair elastics costs about $4 to $8, and a wide tooth comb for sectioning hair runs $5 to $10 at Target or Walmart.
A Braided Crown With Space Buns Adds Personality Without Extra Difficulty
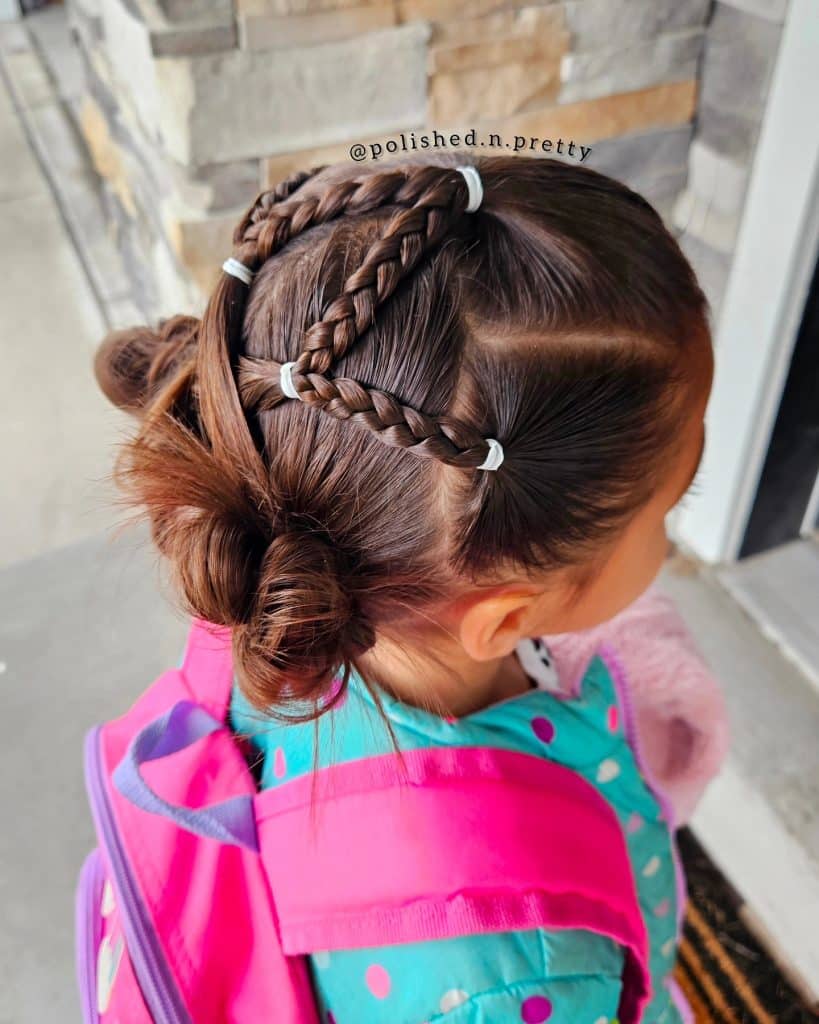
Wrapping a single braid around the crown of the head and finishing the rest in two low buns is a lovely next step once basic braids feel comfortable, since it only adds one small new skill on top of what you already know. The braid itself uses the same technique as any other, just placed along a curved path instead of a straight line. That single variation opens up a whole new category of styles.
Sectioning hair into clear zones with clips before starting the braid, a technique frequently recommended in styling guides on Byrdie, keeps the crown section separate from the bun sections until you are ready for each part. That organization prevents a lot of mid-braid confusion.
Budget Guide: Small sectioning clips typically cost $5 to $10 for a pack, and colored hair ties for the buns run $3 to $7 at Target or Amazon.
A Half Up Braided Bun Gives Long Hair Structure Without Full Commitment
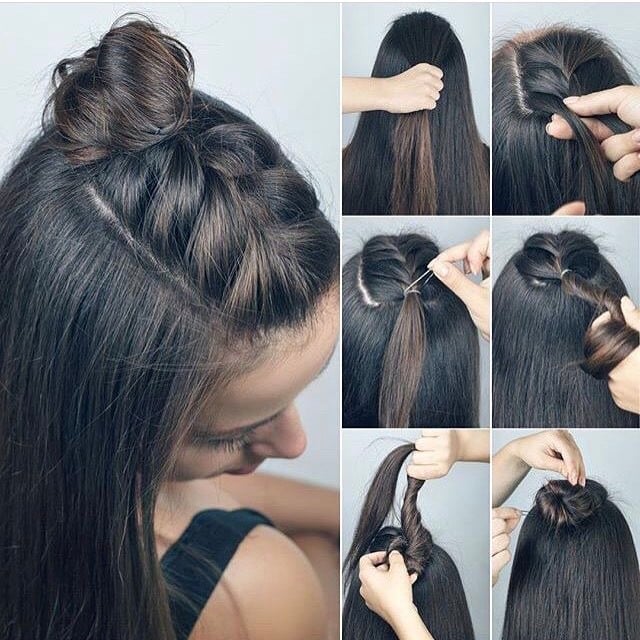
A half-up style that braids only the crown section before twisting it into a small bun is one of the most versatile braid projects for someone with longer hair still building confidence. Leaving the bottom half of the hair down means only a small section needs to be managed, which keeps the whole process quick even while you are still learning. That smaller scope makes mistakes far less noticeable too.
Following a numbered photo sequence rather than a video, a learning method some beginners find easier according to styling breakdowns on Allure, lets you pause and study each step at your own pace. That control matters when you are still building muscle memory.
Budget Guide: A small clear elastic for the bun costs under a dollar each, and bobby pins to secure loose pieces run $3 to $6 at Ulta or Target.
The Family Win Box
If you are just starting out with braids, pick one single style and repeat it for a full week before trying anything new. Repetition on the same pattern is what actually builds the muscle memory. Jumping between styles too early is one of the biggest reasons beginners feel like they are never improving.
Two Braids Meeting At A Bow Create A Sweet Statement Style
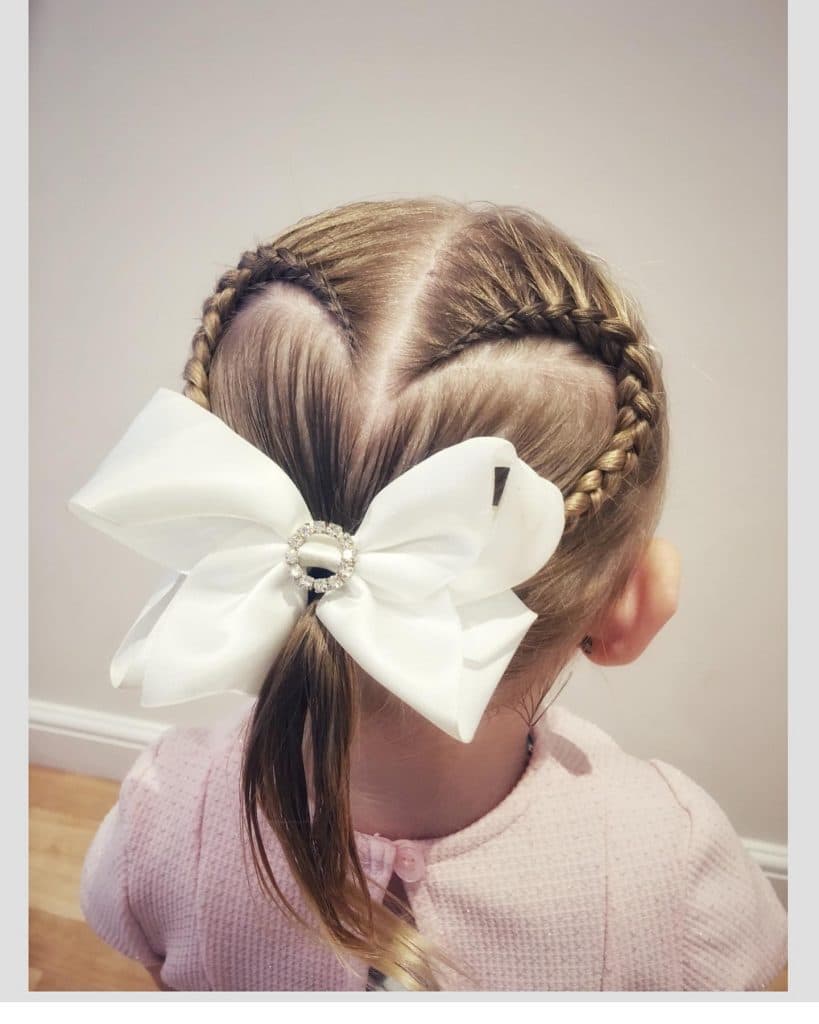
Parting hair into a heart shape and braiding each side down into a single low ponytail secured with a bow is one of the most charming braid styles once you have basic pigtails down. The heart-shaped part is really just a variation on the straight part you already know how to make. That small creative twist turns a familiar technique into something that feels special.
Using a rat tail comb to create the curved heart part, a tool tip frequently mentioned in styling tutorials on Real Simple, gives you far more control over the curve than fingers alone. That precision is what makes the heart shape actually read clearly once finished.
Budget Guide: A rat tail comb typically costs $4 to $9, and a decorative hair bow runs $8 to $18 at Claire’s, Target, or Amazon.
Learning Dutch And French Side By Side Makes The Difference Finally Click
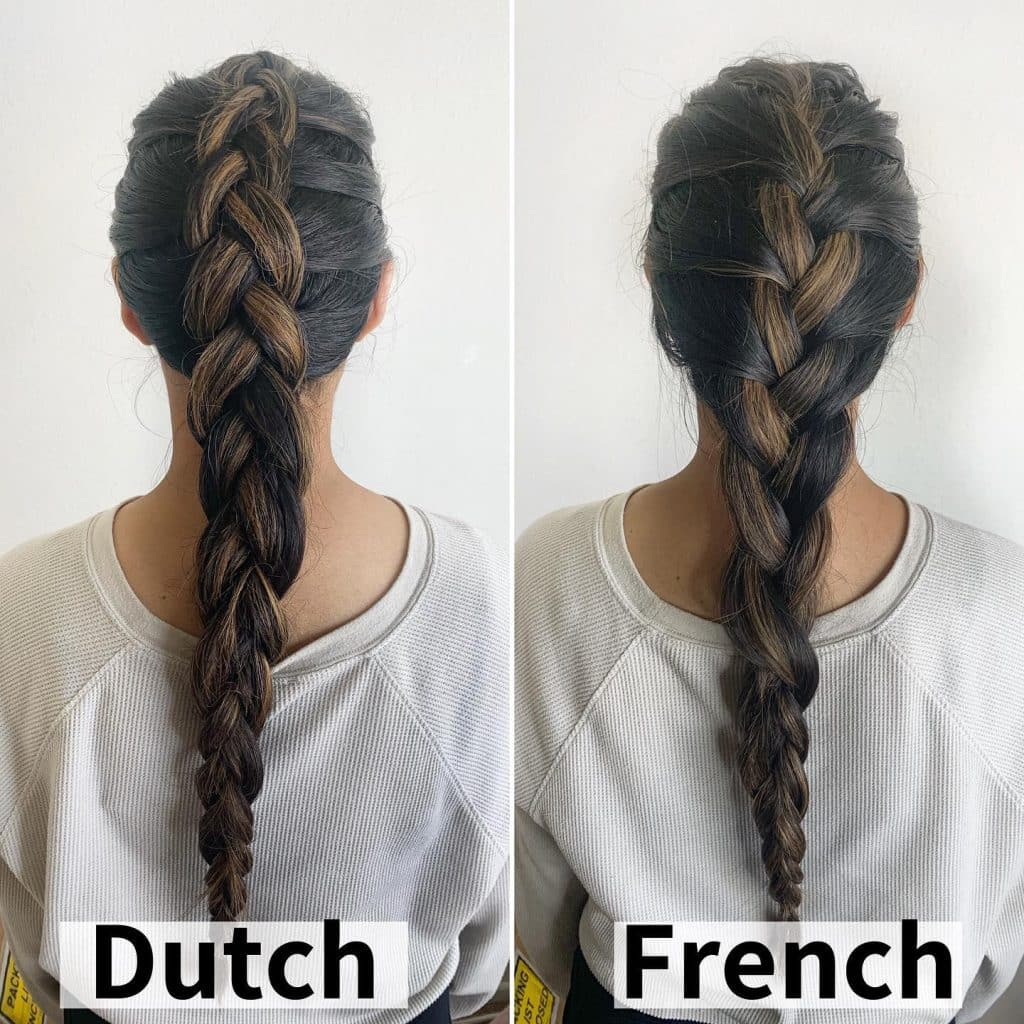
Practicing a Dutch braid on one side of the head and a French braid on the other, back to back, is one of the fastest ways to actually understand what separates these two braids once and for all. Dutch braids cross strands underneath, giving a raised, more three-dimensional look, while French braids cross over the top for a flatter finish. Seeing both side by side on the same head removes all the confusion that comes from switching between separate tutorials.
Working slowly through both braids in front of a mirror rather than relying on feel alone, guidance often given in beginner tutorials on Martha Stewart, lets you actually watch the crossing pattern happen. That visual feedback is what finally makes the difference between the two techniques obvious.
Budget Guide: No special supplies are needed beyond a comb and a couple of small elastics, which together cost under $10 at any drugstore or Target.
Why Braids Actually Get Easier With Repetition, Not Talent
There is a reason so many moms feel like braids are a skill they were simply never given, and that reason has almost nothing to do with natural talent. Braiding is a physical pattern your hands learn through repetition, the same way any other hand skill develops over time. That truth alone should take some of the pressure off.
Part of what makes early attempts at braids feel so discouraging is expecting your first try to look like a photo taken by someone who has practiced for years. Every single polished braid online started as someone’s messy, uneven first attempt on a patient or not-so-patient kid. That context genuinely matters.
The Real Talk Box
Most articles about braids make it sound like you need special talent or years of practice, and that simply is not true. The real difference between a beginner and someone experienced is just repetition, not some natural gift you either have or do not. Give yourself the same patience you would give a kid learning something new for the first time.
This is also a skill that benefits enormously from practicing on your own hair first, in a mirror, without the added pressure of a squirming child. Muscle memory built slowly on your own head transfers far more smoothly than trying to learn and teach a wiggly kid at the same time. That extra step saves real frustration later.
For a busy mom, braids eventually become one of the fastest tools in your entire morning routine rather than the dreaded task they start out as. The five minutes you once spent frustrated in front of the mirror eventually become five minutes of something closer to muscle memory.
Enjoyed this post?
Share the love with another mom!
Every share helps this little blog grow — thank you so much




[…] morning sent me down a real rabbit hole of braid inspiration, not the kind that takes two hours, but the kind that actually survives a school […]